![]()
Migrating Azure AKS to Huawei CCE
V1.0 – January 2024
| Version | Author | Description |
|---|---|---|
| V1.0 – 2024-01-16 | Diogo Hatz 50037923 | Document Translation |
| V1.0 – 2024-01-16 | Wisley Paulo 00830850 | Document Review |
Kubernetes Cluster Migration from AKS to CCE
Introduction
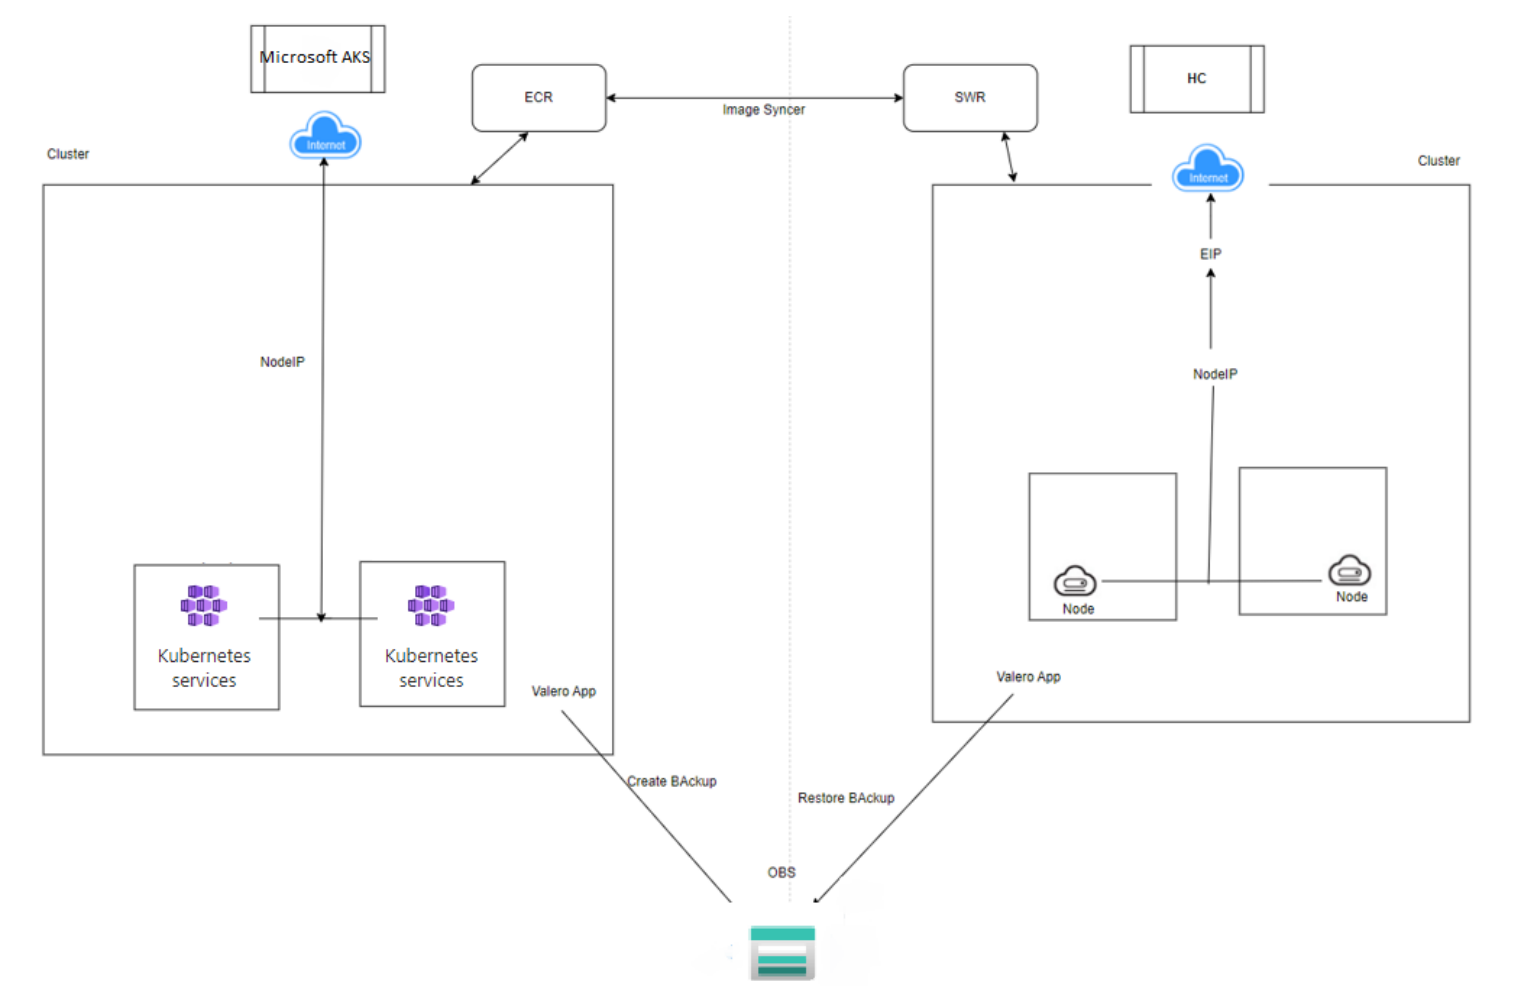
Migrating the Kubernetes service AKS from Microsoft Azure to Huawei Cloud’s Cloud Container Engine (CCE) managed cluster service is a strategic decision that can empower organizations to refine their container orchestration strategy in response to the growing demands of the cloud landscape. The transition represents an opportunity to optimize operations, increase scalability, and analyze the Huawei Cloud ecosystem. Crucially, the migration journey is guided and facilitated by the powerful Velero container backup and migration tool, ensuring data integrity and minimizing service disruption. Whether the migration is driven by cost-effectiveness, the desire for smooth integration with Huawei Cloud services, or the quest for higher performance, this guide provides a detailed step-by-step guide for a successful transition, enabling your enterprise to embrace the cloud-native era with confidence, along with the immeasurable support of the Velero tool.
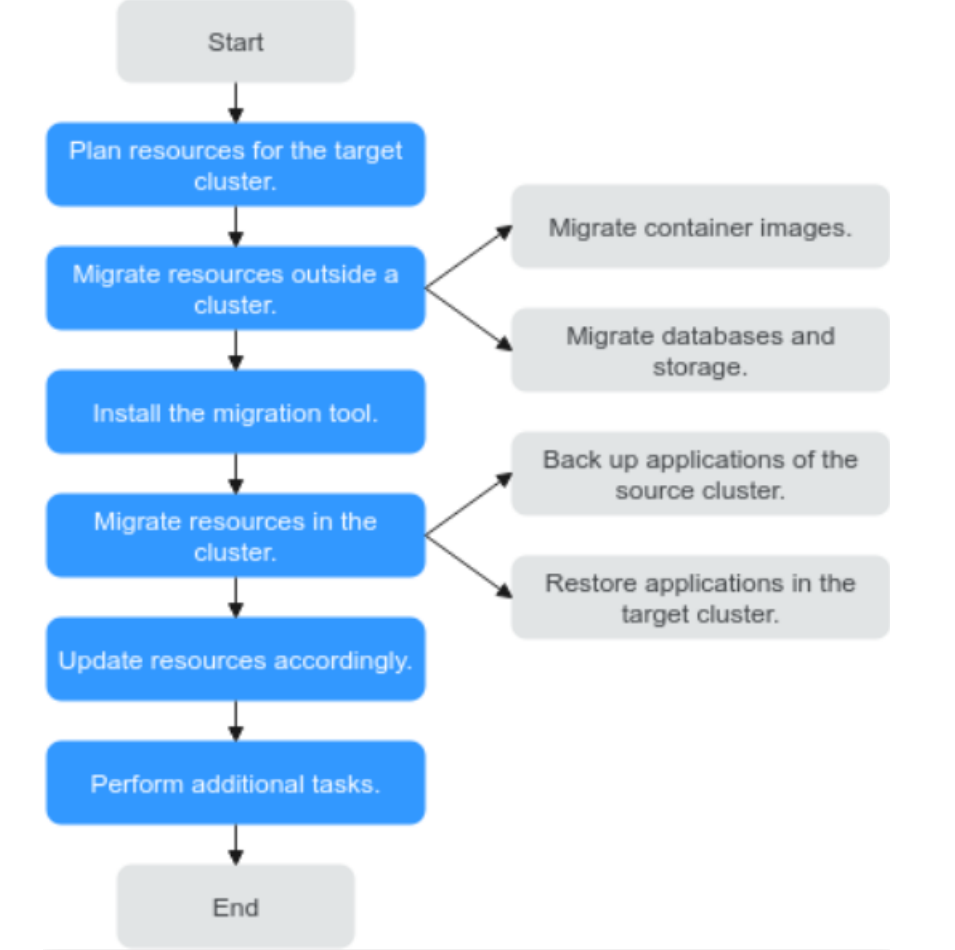
Operation Process
For the migration of Microsoft Azure Kubernetes Service (AKS) to Huawei Cloud Container Engine (CCE), a meticulous operation was performed. First, a detailed analysis was conducted to identify all workloads, configurations, and dependencies within the AKS cluster. The necessary resources were provisioned within Huawei CCE, ensuring compatibility and scalability to accommodate the workloads. Preparations for data migration were then made, including the transfer of container images, persistent volumes, and configuration files, all backed up by Velero for reliable backup and restore. The migration itself was executed carefully to minimize downtime, with continuous monitoring throughout the transition to promptly address any challenges. After the migration was complete, workloads on Huawei CCE were validated to ensure stable operation. Configurations were optimized as needed, and monitoring and maintenance practices were established to ensure the continued success of operating containerized applications in the Huawei CCE environment. The migration process ensured a smooth and successful migration, aligning the infrastructure with the evolving needs and strategies of Huawei Cloud Container Engine.
Implementation
Microsoft Azure
VPC for Nodes
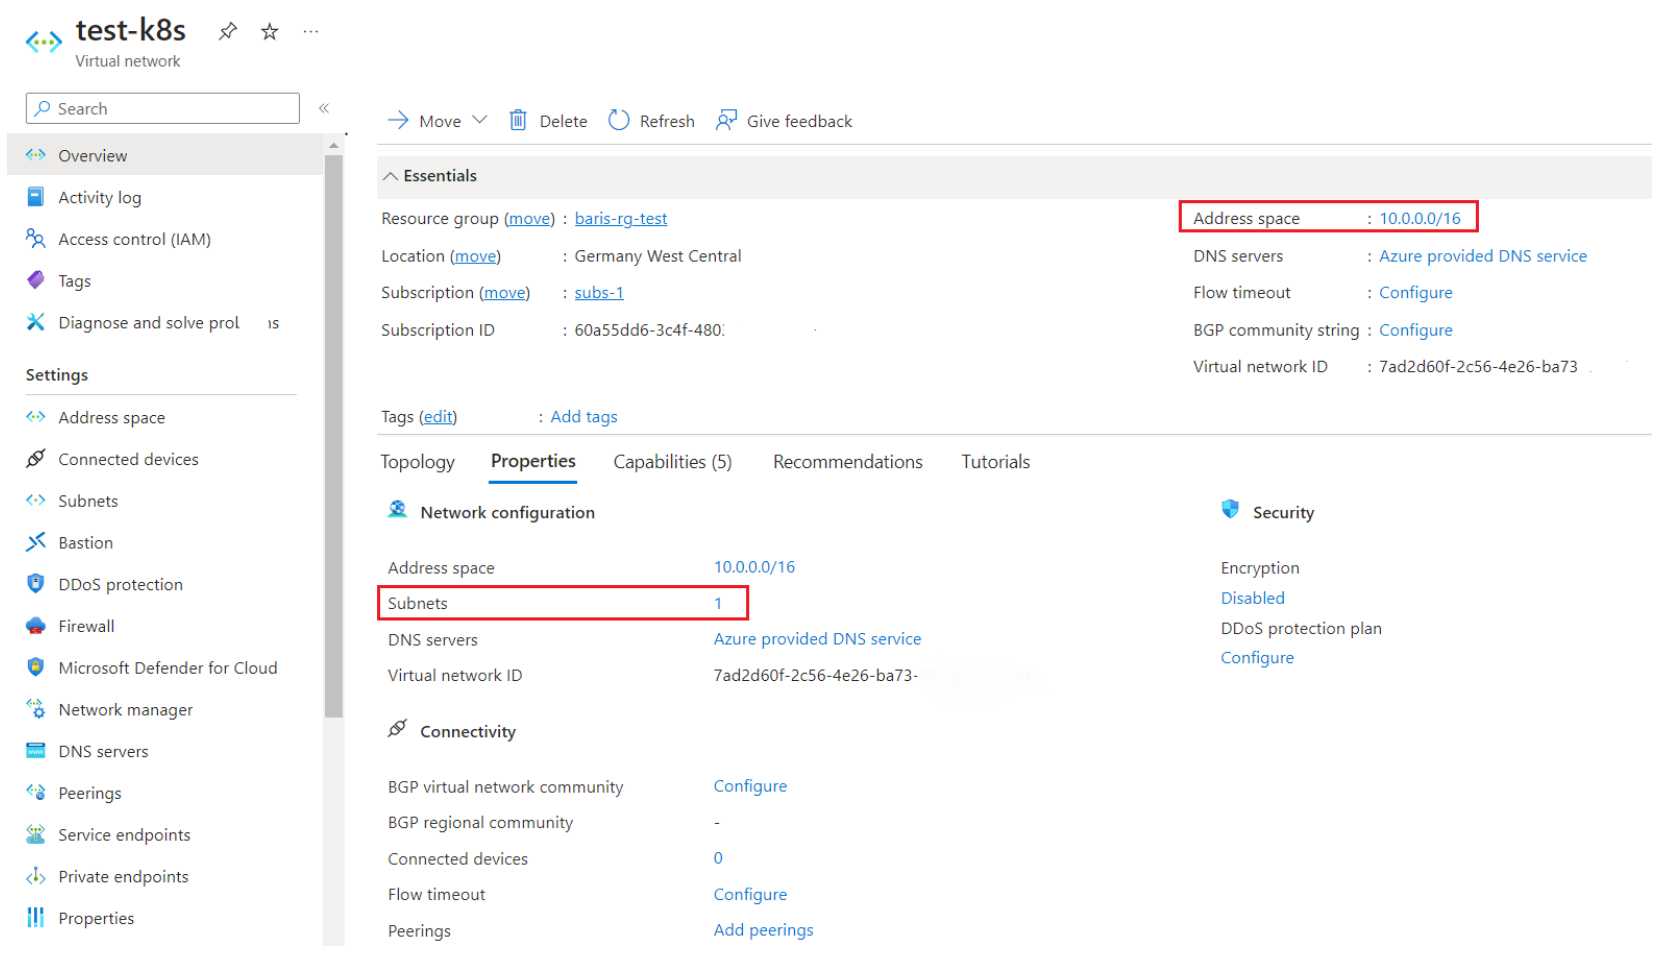
In this example, AKS has 1 VPC with 1 subnet. Virtual networks were used to manage IP addresses, security, integration with Azure services, and other network-related features for AKS nodes. They are an essential part of deploying and managing AKS clusters on Azure.
AKS – Cluster
-
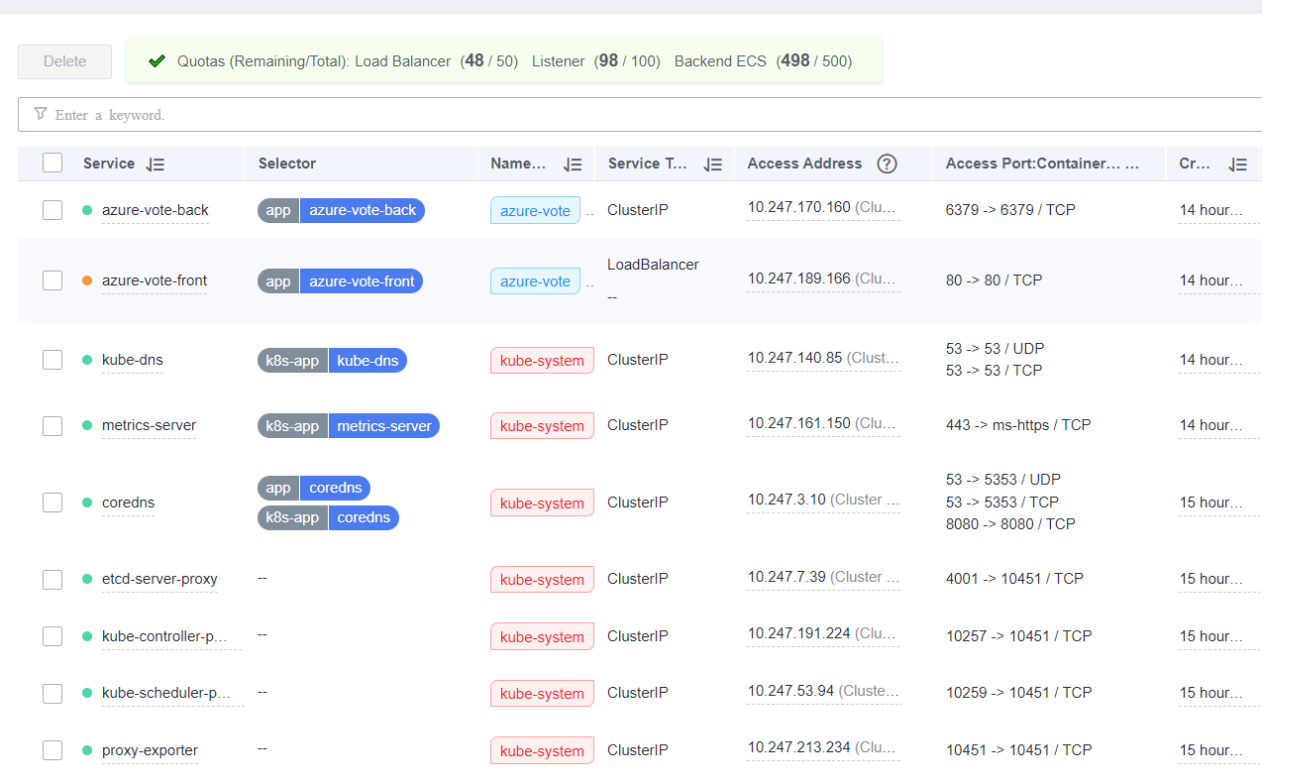
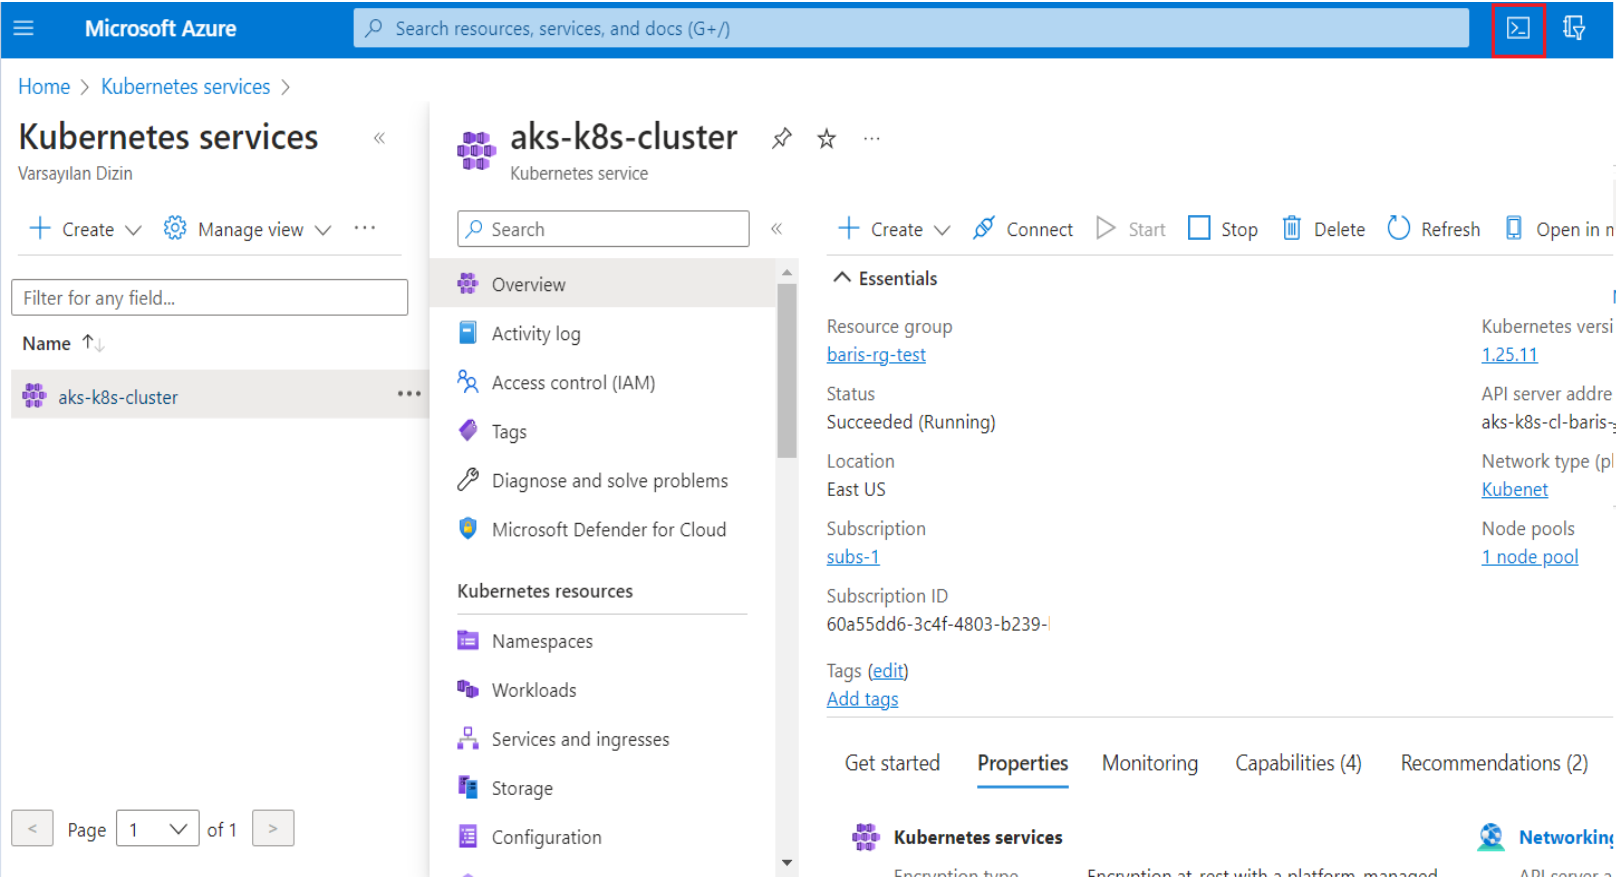
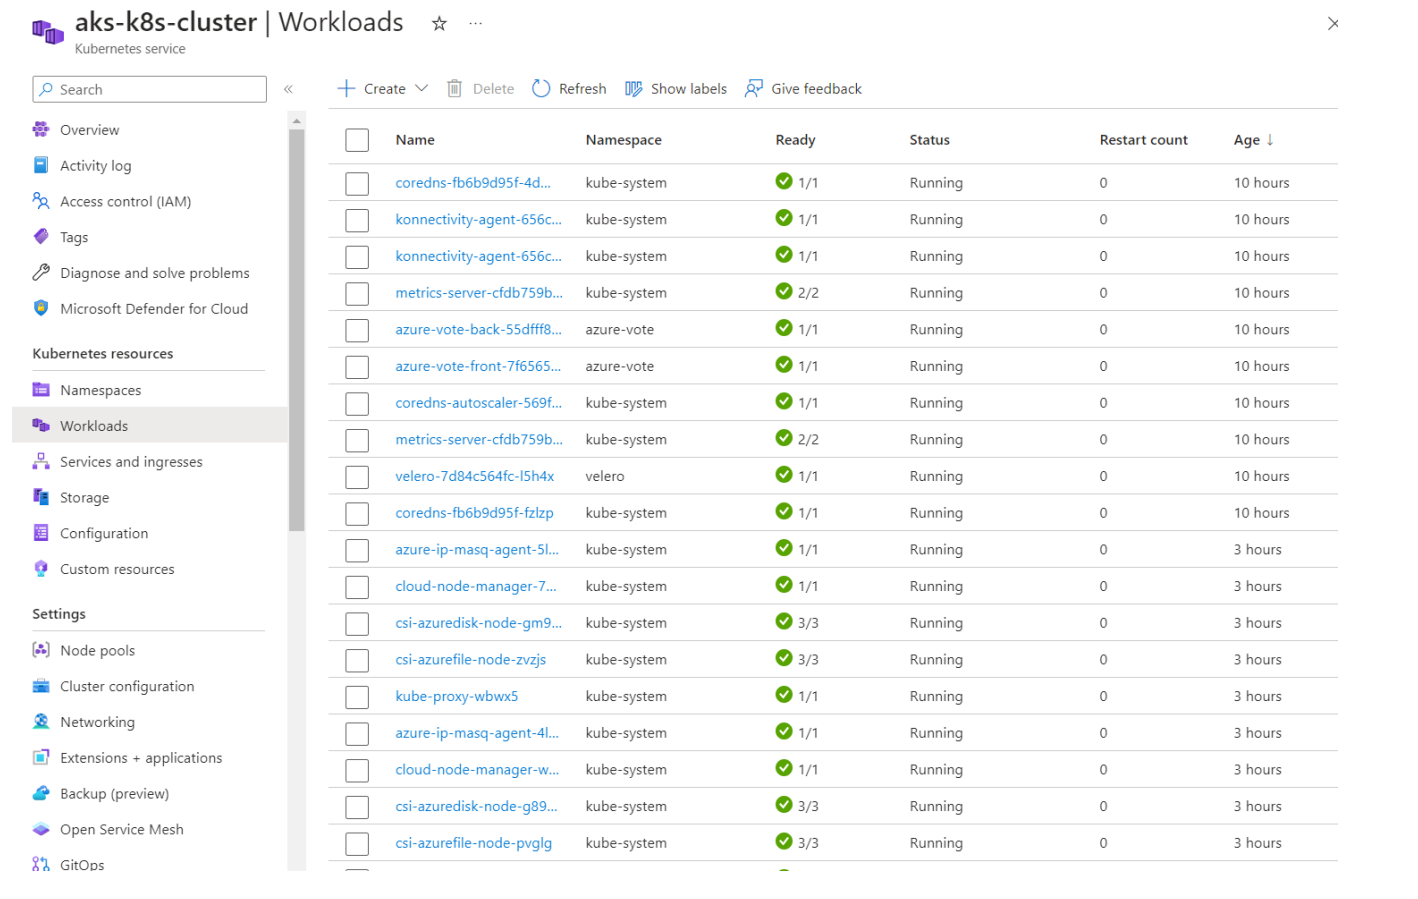
First, you need to check the essential Kubernetes resources, such as workloads, namespaces, storage, nodes, pods, and services.
-
Navigate to the home, Kubernetes services, and click on the Kubernetes service to migrate.
-
Connect to the cluster using the scripting tool to interact directly with the cluster using kubectl, the Kubernetes scripting tool. Kubectl is available within the Azure Cloud Shell by default and can also be installed locally.
- After opening the cloud shell, you also need to configure the cluster subscription and download the credentials.

- After connecting to the cluster, you can check the deployments, namespaces, pods, and cluster information to analyze the cluster.

Preparing Clusters
In this example, there is one nodepool in AKS.

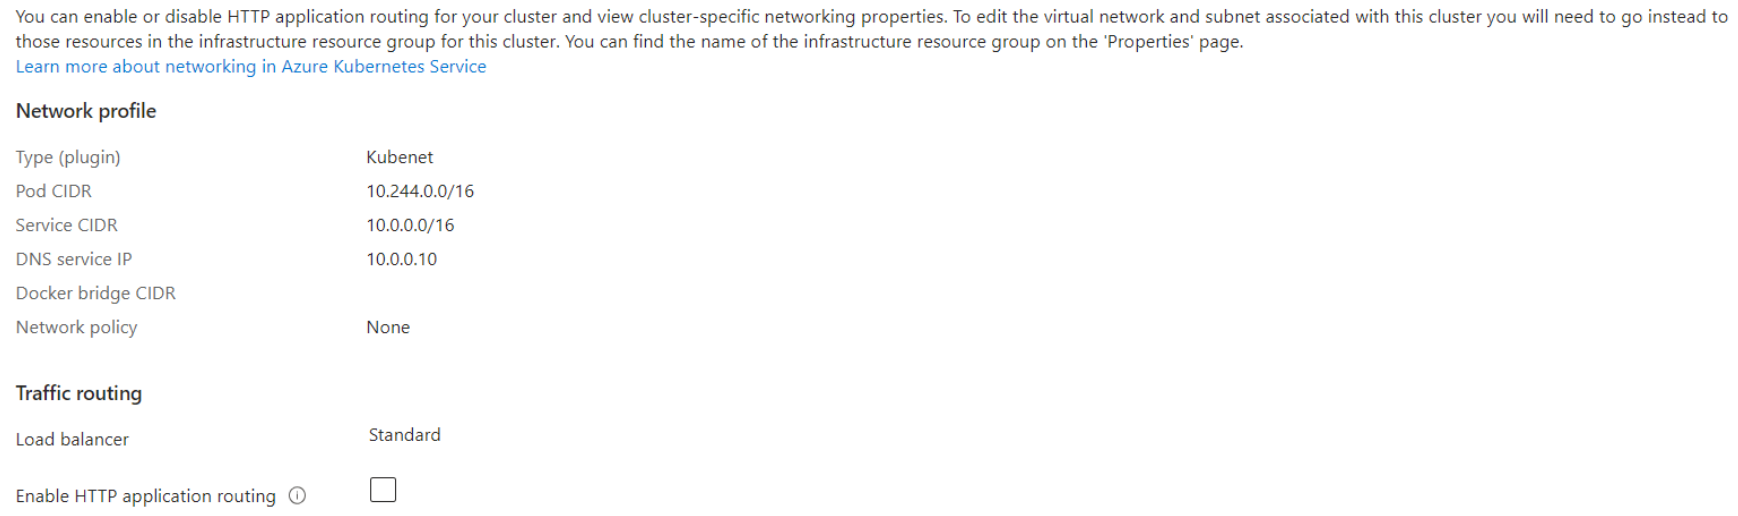
Additional Configurations for Pods and ELB
To use PV and ELB services in AKS, some additional configurations need to be performed. There is no need to install the CSI driver or kubenet plugin, you only need to enable them.
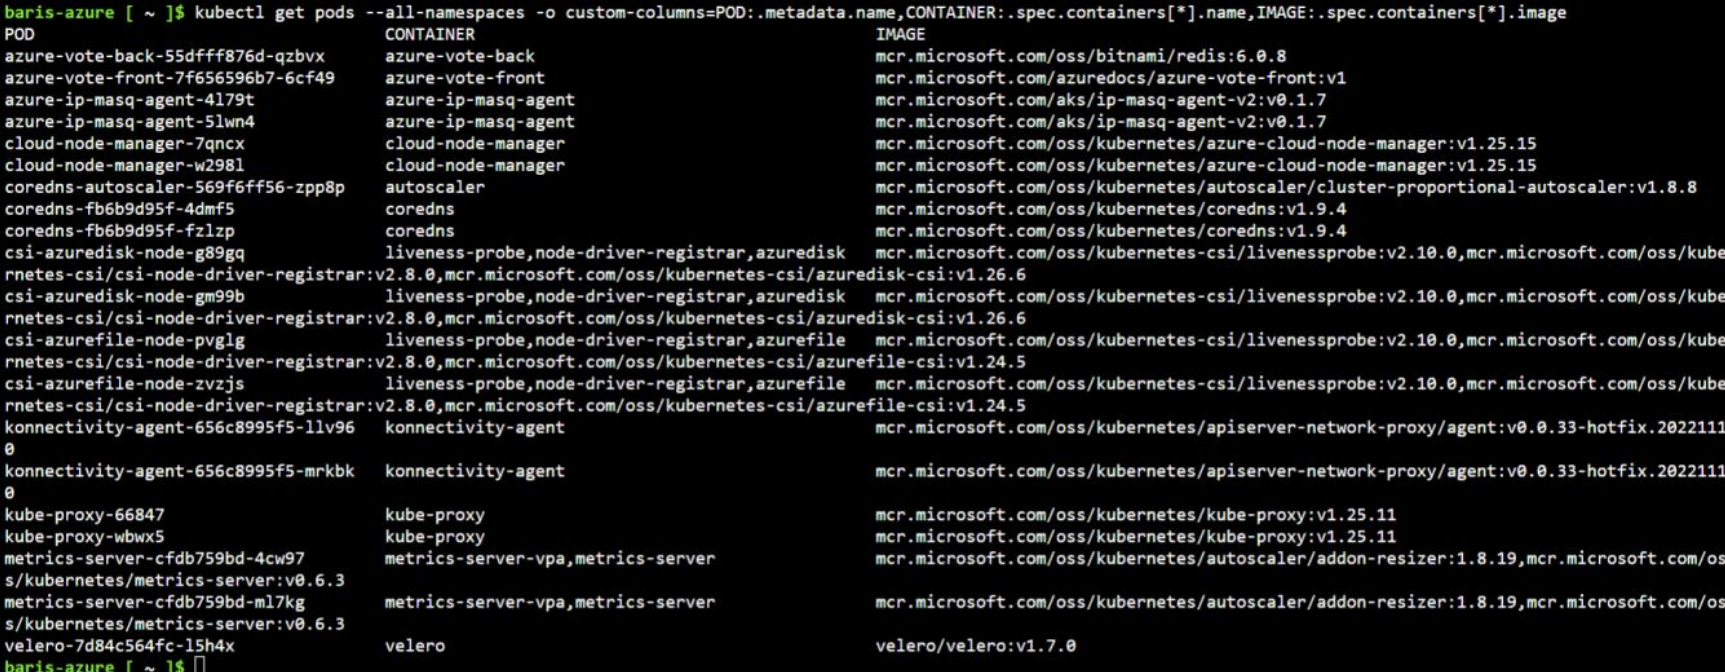
Also, you can view images of containers running on Kubernetes using:

Installing Velero and performing additional configuration
- First, verify the AKS cluster and resource group using the following command:

- Configure the kubeconfig file:

- Check if the user account is storage is configured or not. If not, create a storage account using the following command:

- Install Velero on Azure Cloud Shell:

- Install Velero Server on AKS cluster:

- At this point, the “credentials-velero” file needs to be populated with certain parameters, such as “Azure_Client_ID”, “Azure_Subscription_ID”, “Azure_Tenant_ID”, “Azure_Client_Secret” and “Azure_Resource_Group”. These settings can be obtained in step 5 above.
-
Only the “Azure_Client_ID” parameter is obtained through the Azure console. To obtain this parameter, navigate to “Azure AD” and click on “APP Registrations”, select “All Applications” and “Storage account” to get the Client ID.
-
Azure AD > APP Registrations > All Applications > Storage Account

- Finally, install Velero on AKS. Check all the variables and values before starting Velero.

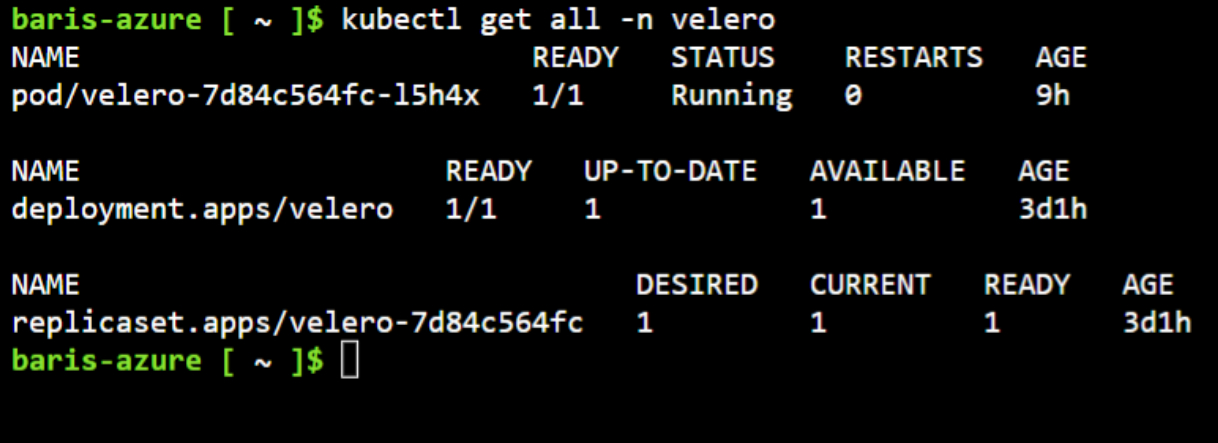
- Check whether the pods, deployments and replicasets are created or not.
Creating a backup using Velero
- Create a new backup using the command: “./velero backup create $Backup_Name” and wait a few minutes until the backup is completed.

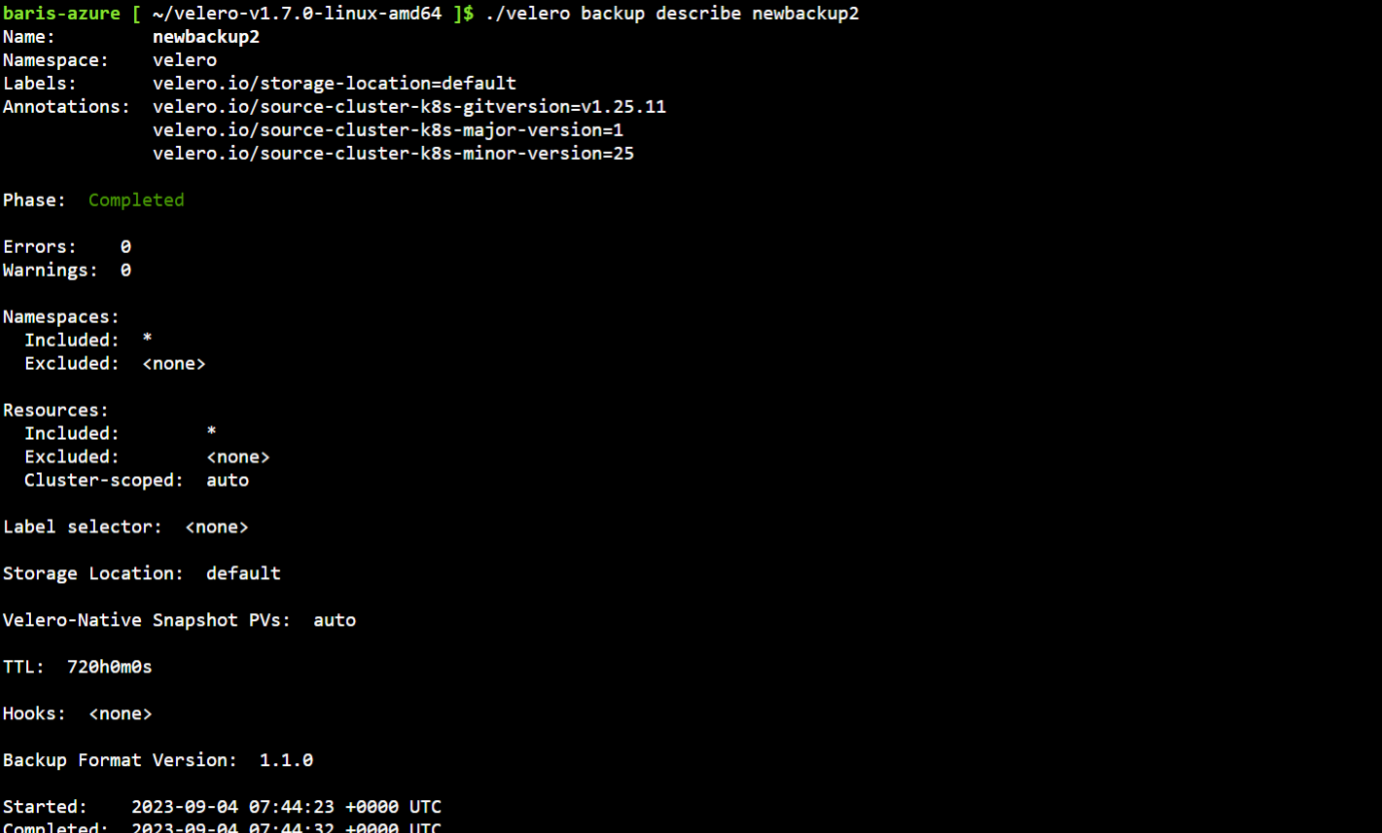
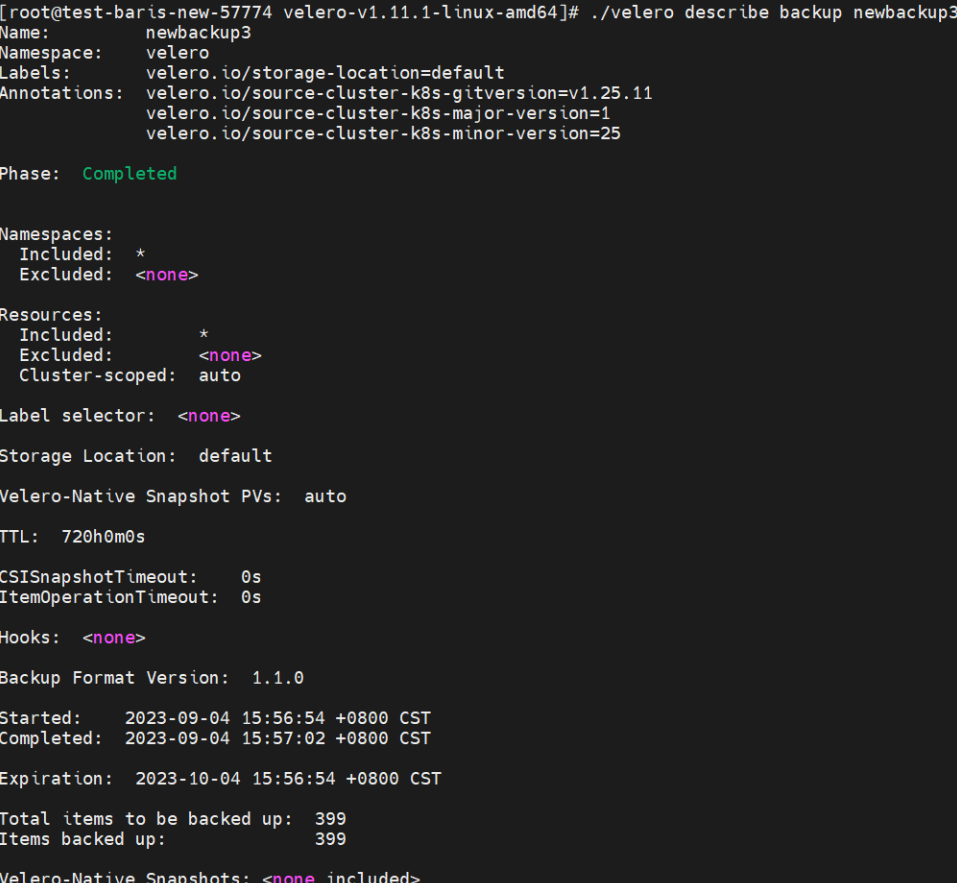
- Check whether the backup is complete or not. You can use the following command to verify:
./velero backup describe newbackup2
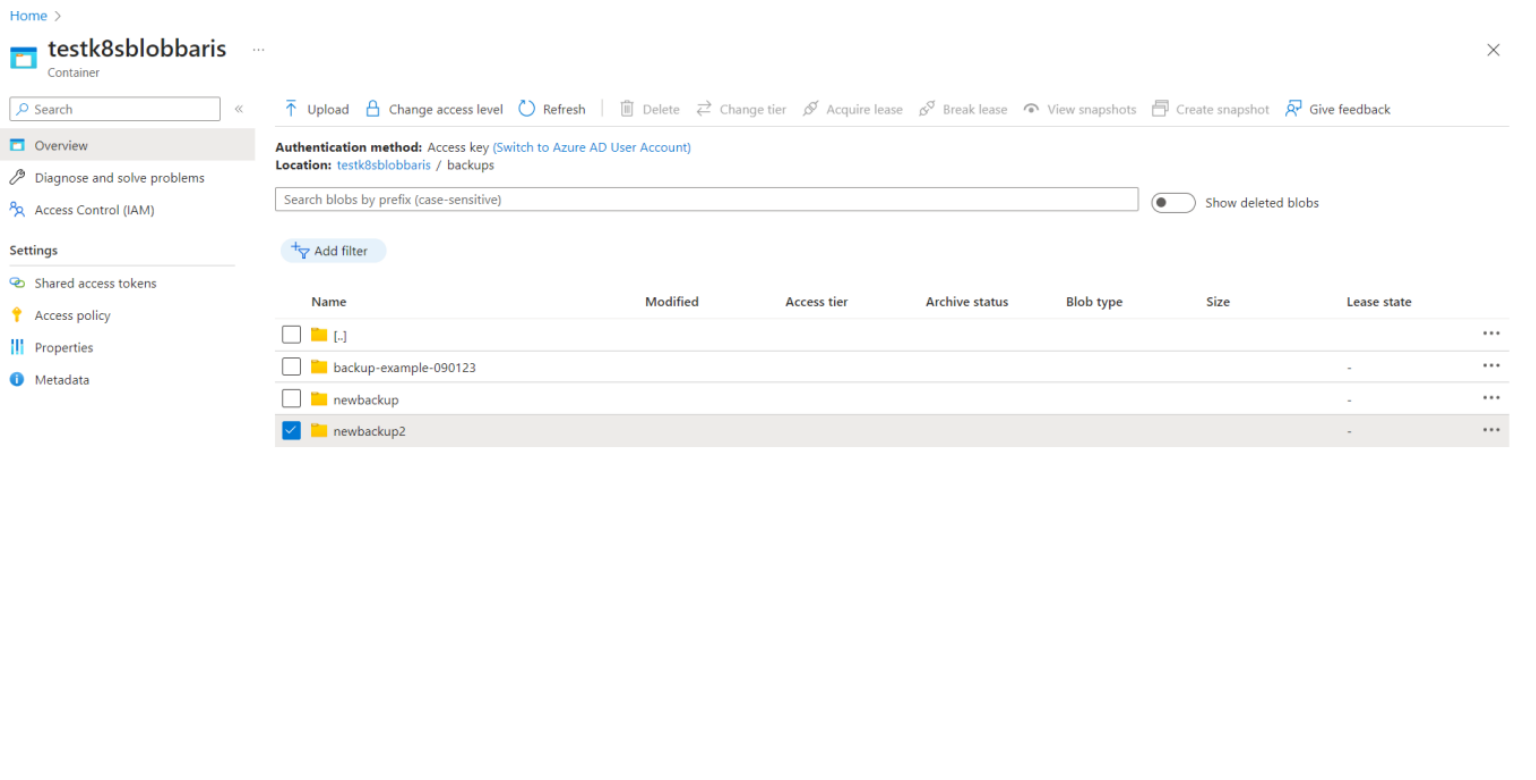
- Navigate to the storage accounts section and check if the data was successfully backed up. Navigate to Home > Storage Account > Containers.

Huawei Cloud
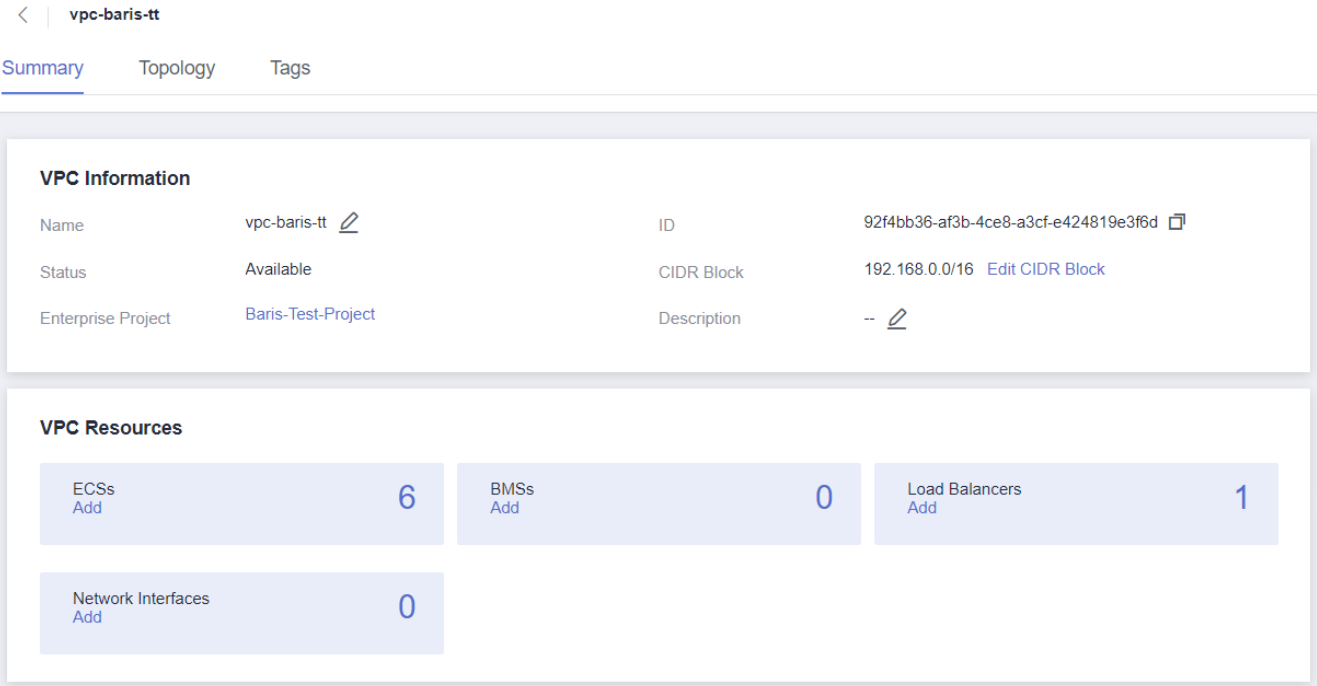
Create a VPC
First, a VPC needs to be created. In this example, the subnet with CIDR 192.168.0.0/16 will be used.
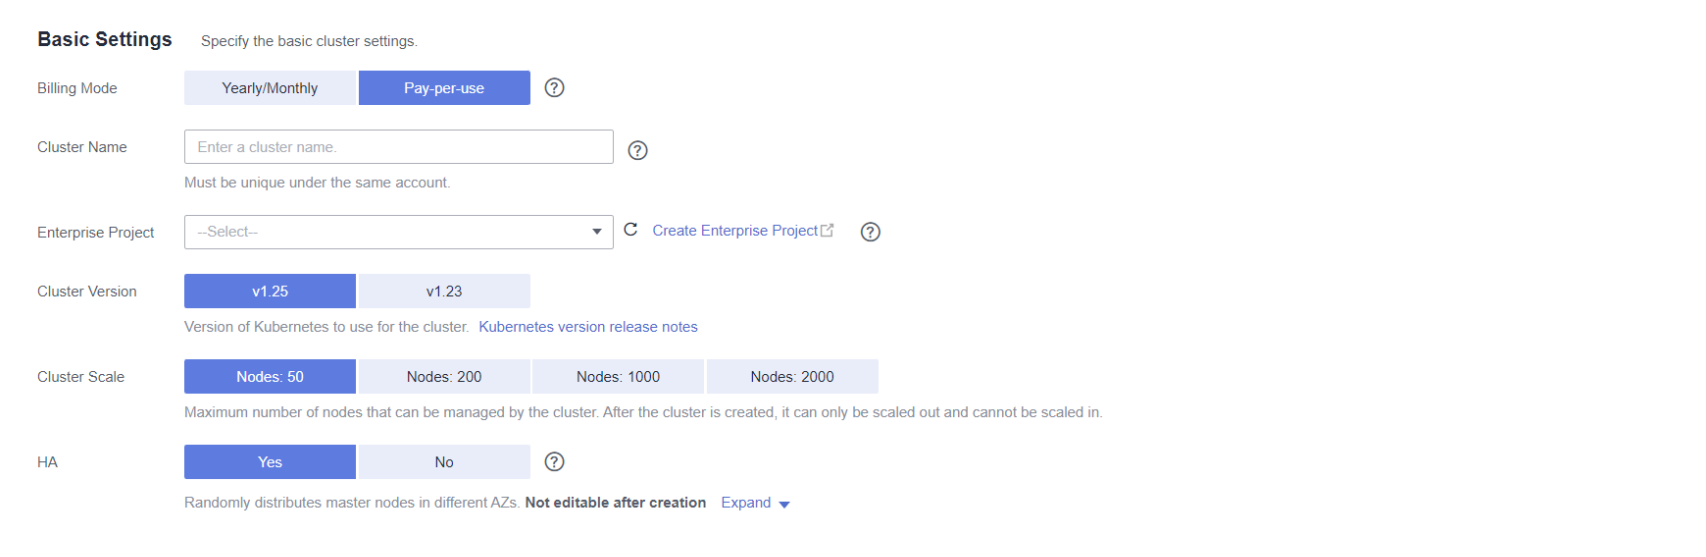
Create Cluster in Huawei Cloud Console
-
Navigate to the CCE console and click “Create CCE”;
-
Select the corresponding AZ;
-
Select the specifications according to the scenario;
-
Select the appropriate VPC and security group;
-
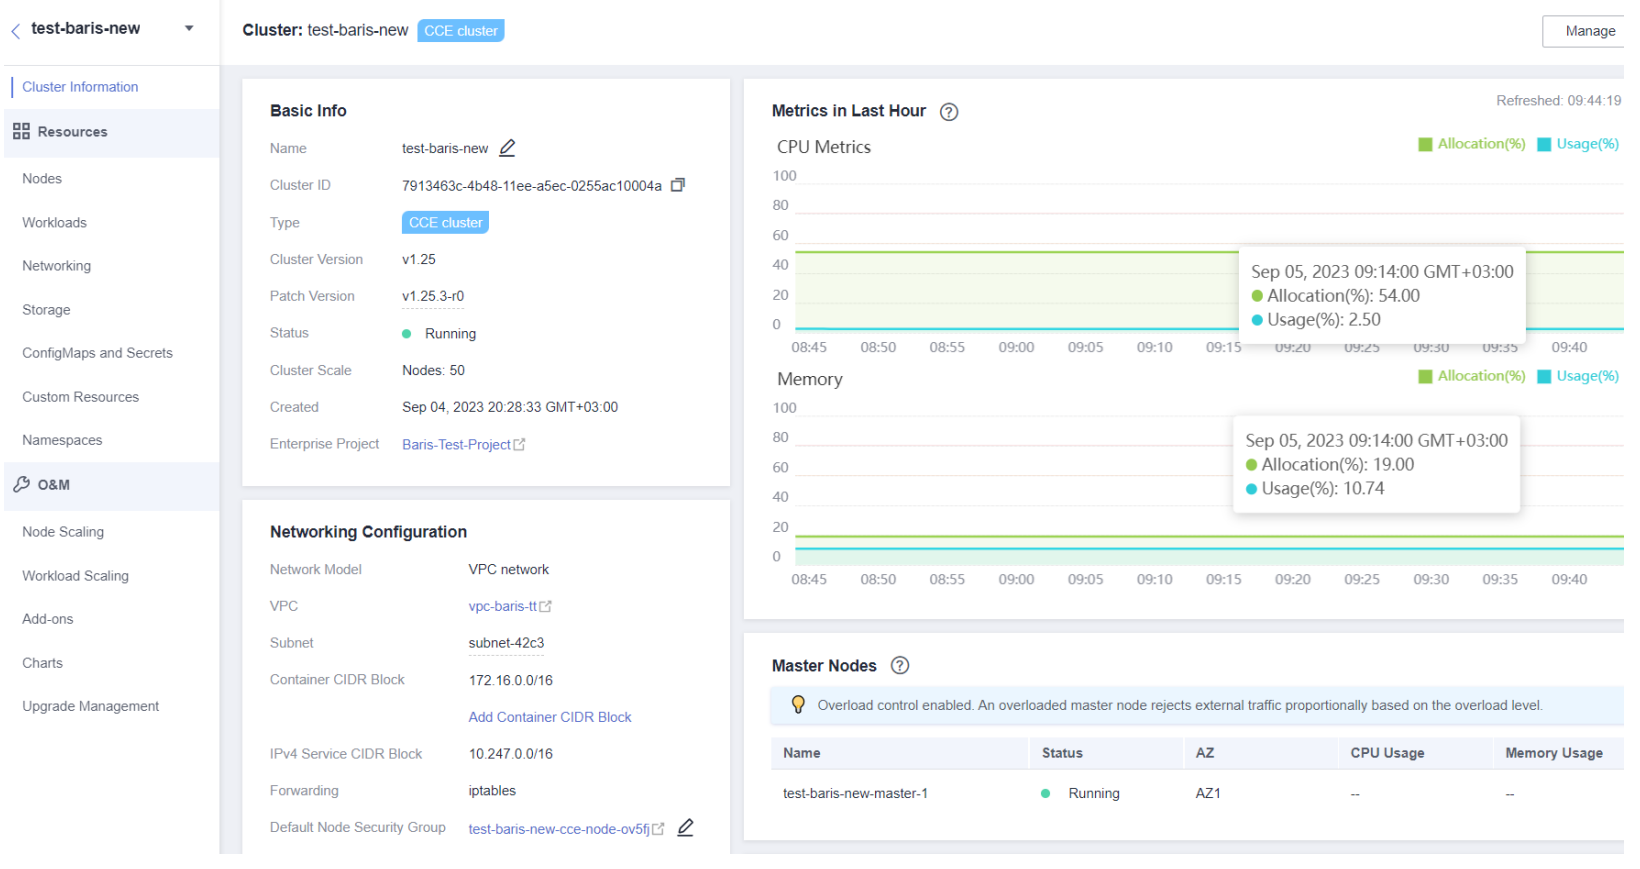
After the CCE is created, log in to the created ECS instance;
-
Test the connection and attach an EIP if necessary.

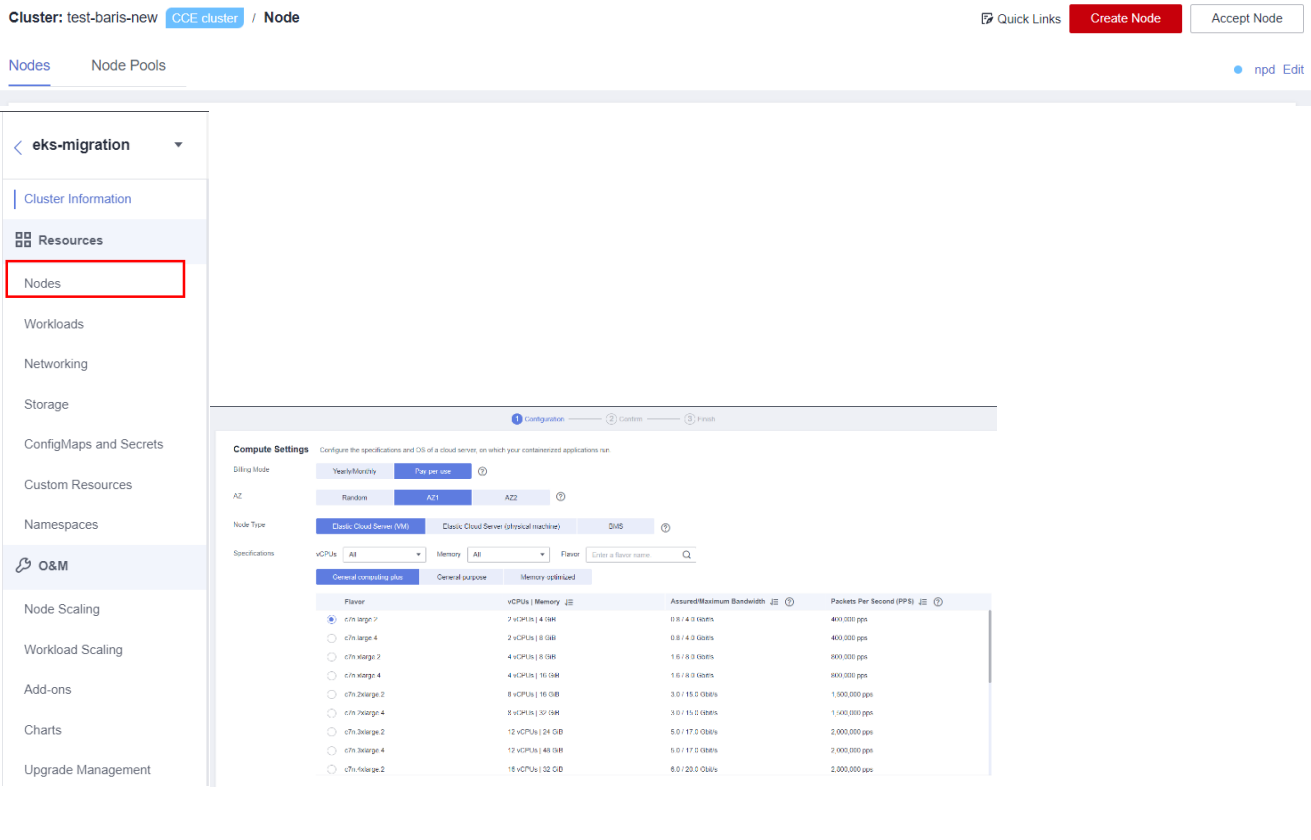
Create the nodes
-
Go to the Nodes section in the CCE console;
-
Click “Create a Node”;
-
Select the Node Host specifications;
-
Select the Container Engine, OS and Storage;
-
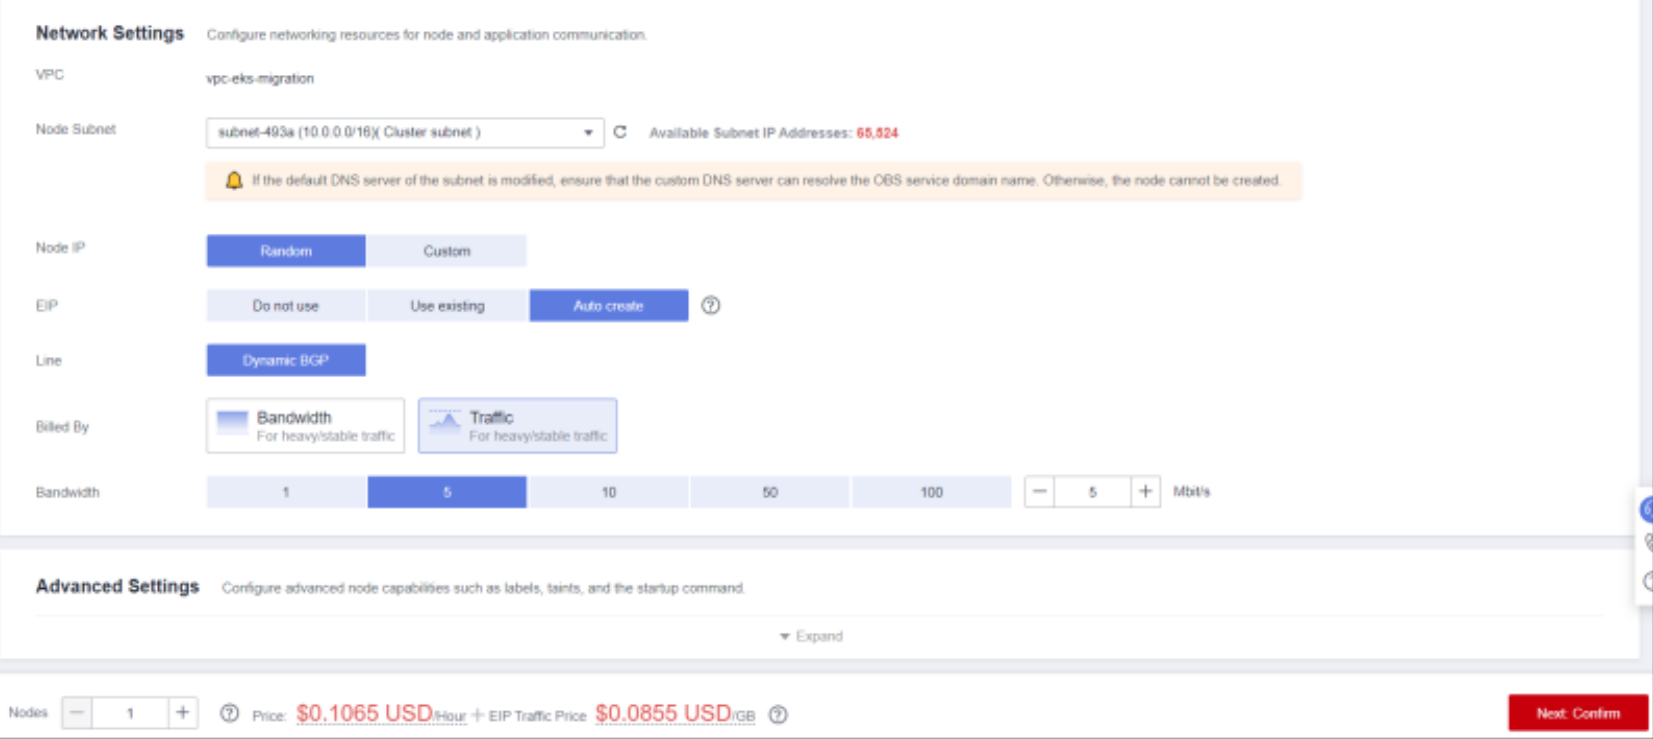
Modify the network as needed.
Install Velero on Source and Target Clusters (Same Process)
-
You need to download kubectl and its configuration file, copy the file to your client, and configure kubectl. After configuring, you can use kubectl to access the Kubernetes cluster.
-
Copy “kubectl” and its configuration file to the “/home” directory on your client. If kubectl has already been installed, you only need to copy the kubeconfig file.
- Log in to your client and configure kubectl. If kubectl has already been configured, skip this step.
- Change the kubectl access mode based on the application scenario. Use the following command to enable intra-vpc-access.

- Check the cluster information.

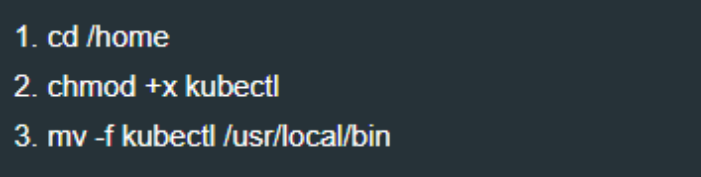
- Run the following commands:
wget https://github.com/vmware-tanzu/velero/releases/download/v1.9.1/velero-v1.9.1-linux-amd64.tar.gz
tar -xvf velero-v1.7.0-linux-amd64.tar.gz
cd velero-v1.9.1-linux-amd64/ && sudo chmod +x velero && sudo mv velero /usr/local/bin
- Create the credentials-velero access file for storage of backup objects.
vim credentials-velero
tar -xvf velero-v1.7.0-linux-amd64.tar.gz
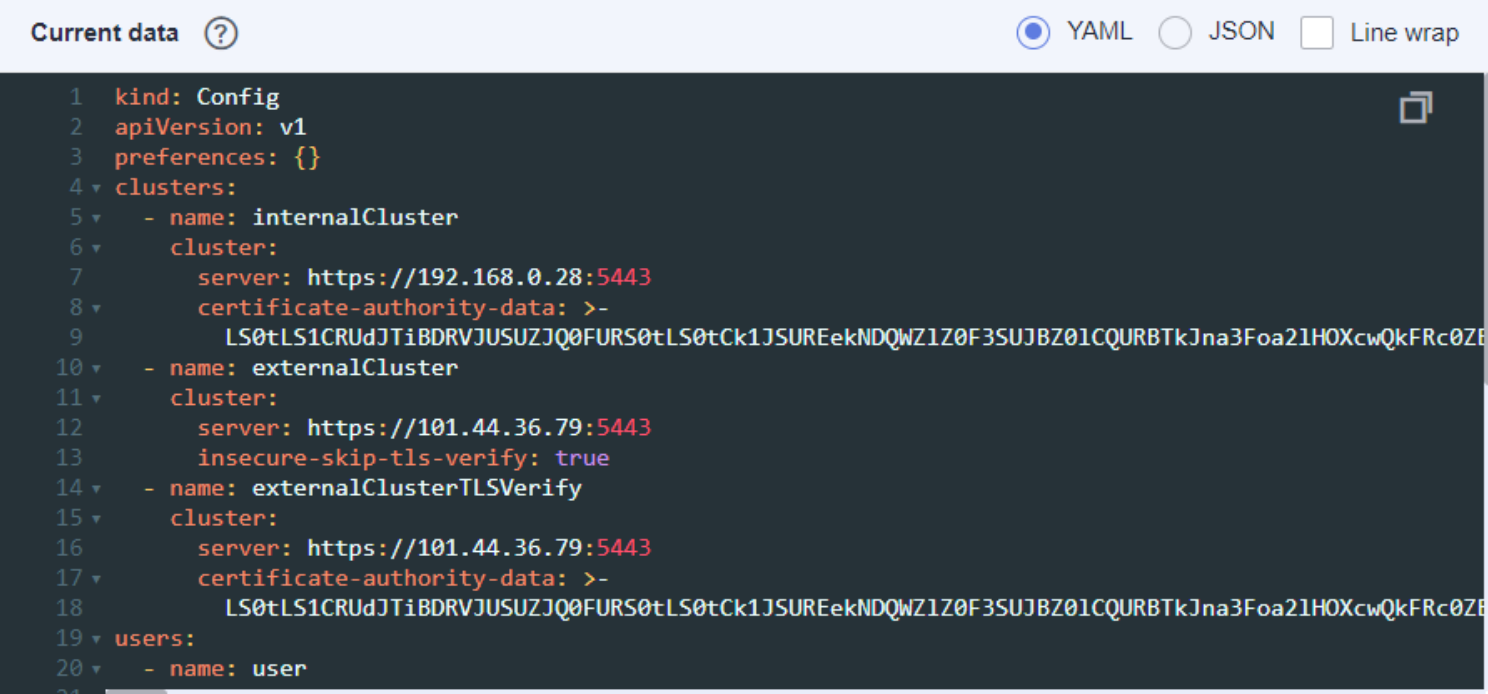
- Configure the variables for the credentials-velero file. Specify all the data specified below:

- Create the velero-credentials configuration file and fill it with the information below:

- Open the Velero client. Change the value of credentials. Specify –provider –plugins –bucket –secret-file –backup-location-config –snapshot-location-config –resource-group. In this example, the bucket name is velero. Change the region and url according to the context of your application.

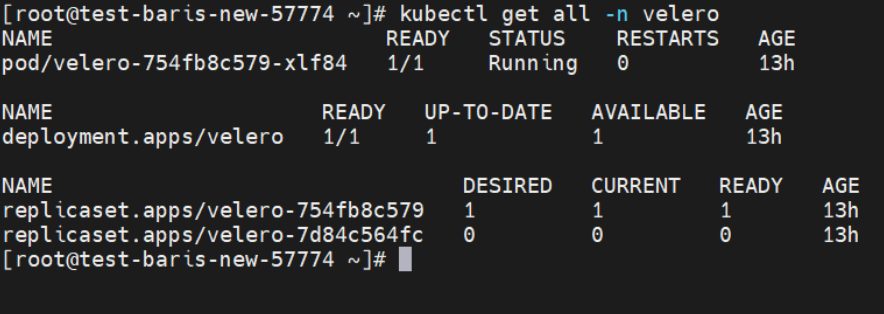
- Verify the Velero installation with kubectl.
kubectl get pod -n velero
Migrating Resources
After installing Velero for both clusters, it is important to check the backup status directly from the Velero server. To do this, you can check the current backups using the command: “./velero get backup-locations”. This command provides important information regarding the backups managed by Velero, ensuring the security and availability of Kubernetes resources.
- To see all available backups, use the command: “./velero get backup-locations”.

- Verify that all backups are available and can be restored
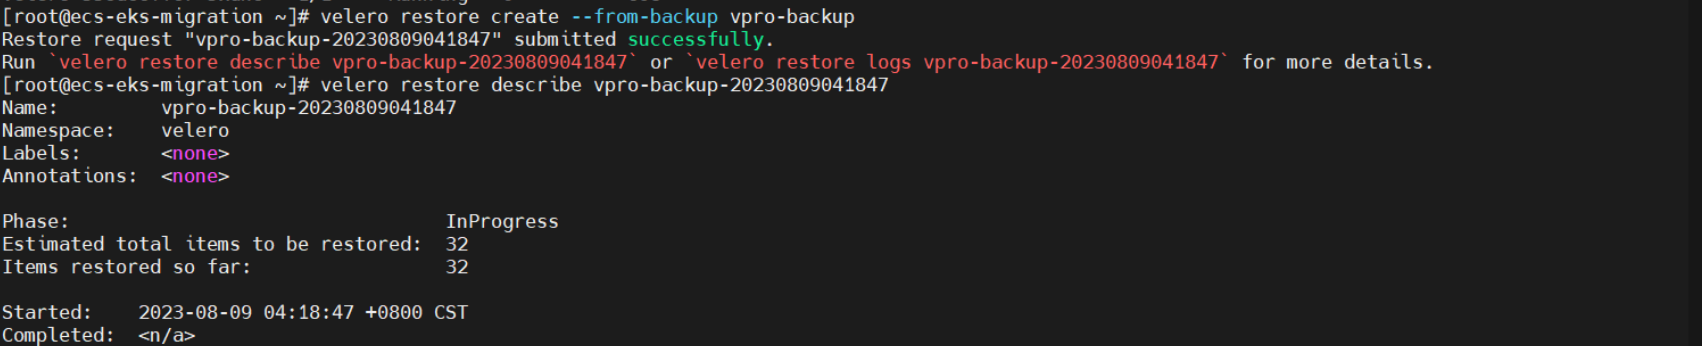
Restoring Applications to the Target Cluster
- Use the Velero tool to create a restore and specify a backup. In this example, the backup named vpro-backup will be used to restore a WordPress application to the CCE cluster.
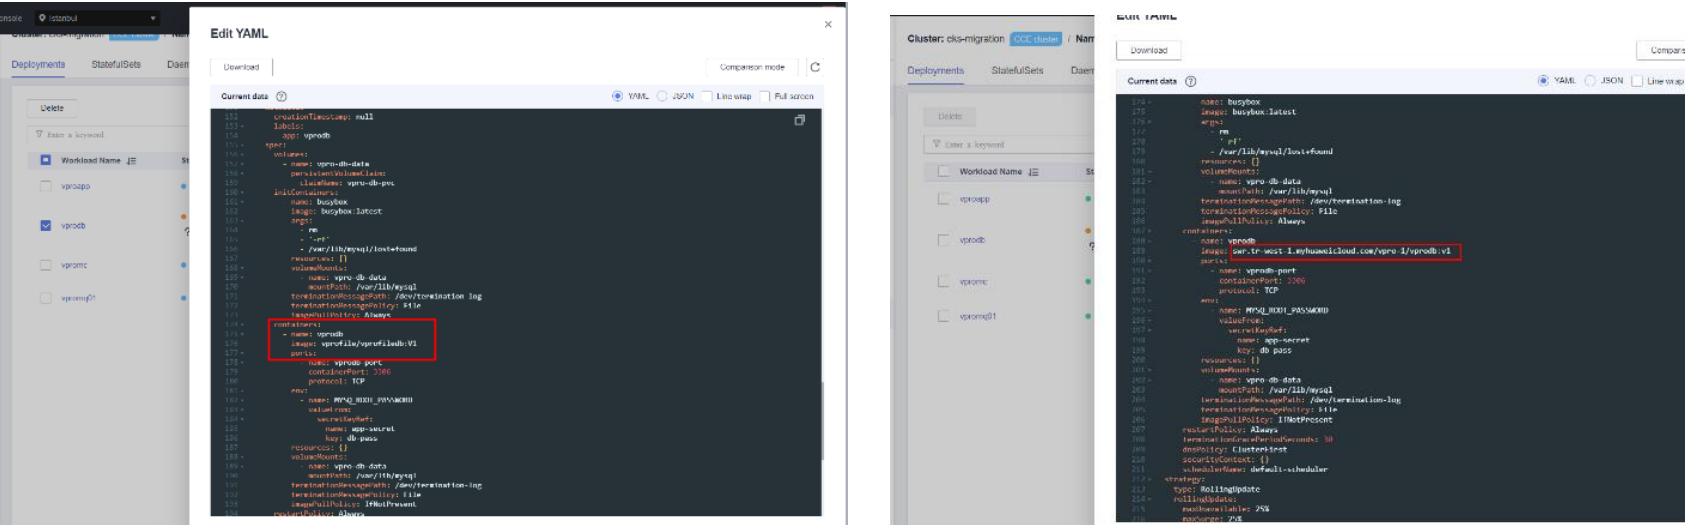
Update the Target Cluster and Validate the Migration
Update the image fields in the yaml files within the CCE cluster according to your SWR.
Edit the specs and annotations fields of the input yaml file according to the rules in the official Huawei Cloud documentation.

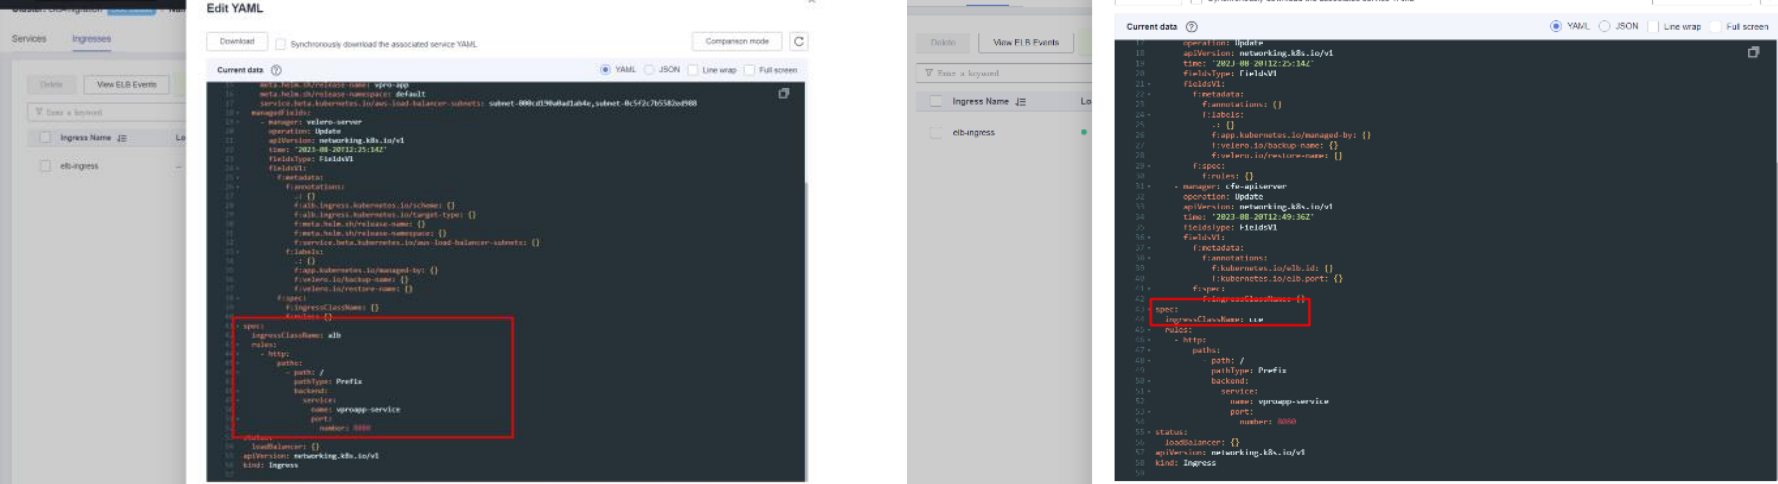
Please verify and validate the cluster