![]()
Mutual Authentication (mTLS) using API Gateway (APIG)
v1.0 – July 2023
| Version | Author | Description |
|---|---|---|
| V1.0 – 2023-07-20 | Thamires Calo 50030210 | Initial Version |
| V1.0 – 2023-07-20 | Gabriel Gutierrez 00817435 | Document Review |
Introduction
HUAWEI CLOUD API Gateway is an API management service, which enables enterprises to publish, secure, and manage APIs while ensuring the efficiency, security, and governance of API operations.
This document aims to explore the use of API Gateway in HUAWEI CLOUD for internal systems integration, ensuring security between client and server using the mutual authentication method (Mutual TLS, mTLS). More details about API Gateway can be found in the official service documentation at:
https://support.huaweicloud.com/intl/en-us/productdesc-apig/apig_01_0001.html
Usual Authentication Scenario
The usual scenario below demonstrates, in a client/server architecture, the use of an API to authenticate end users who will have access to another API. Before consuming the API, the client must obtain an authentication token (using username and password, for example), which must be present on all subsequent requests. Such token is only valid for a certain period of time, so the client application must obtain a new token periodically to continue consuming the API.
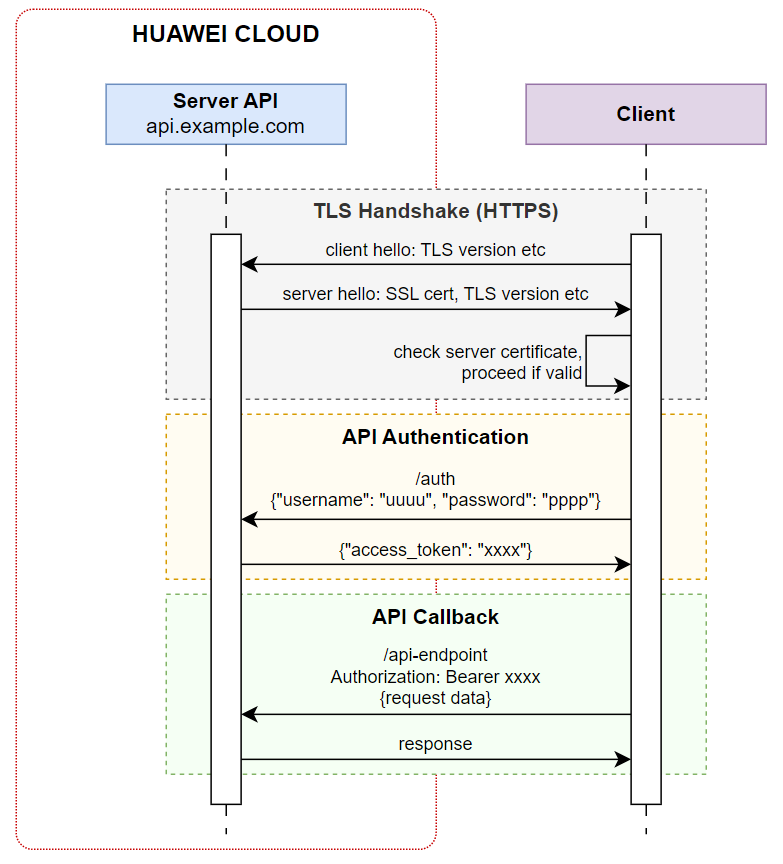
The usage of mutual authentication (mTLS) in HUAWEI CLOUD API Gateway ensures more security and optimizes this authentication process, removing the need of tokens for API client authentication.
Example Architecture
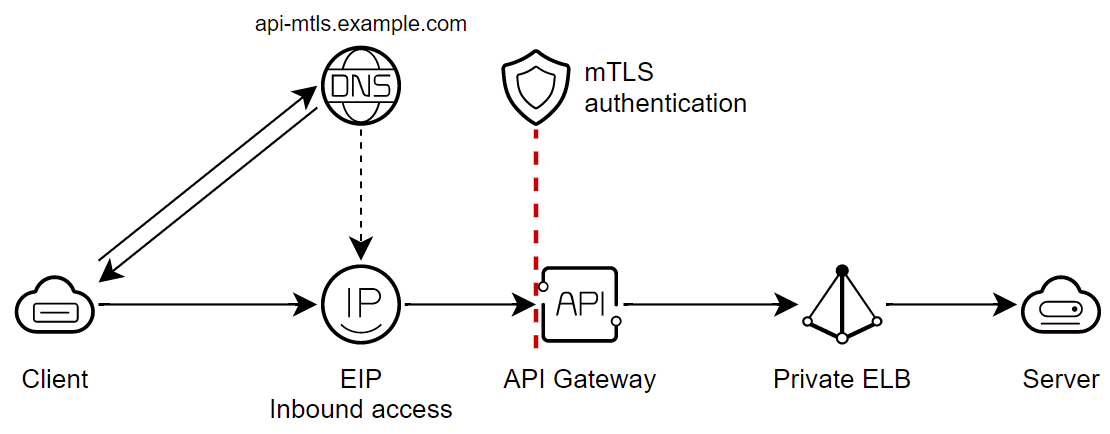
The proposed example architecture for the API Gateway usage scenario in HUAWEI CLOUD is a highly scalable and secure solution for API management.
-
The API that is hosted on a server on HUAWEI CLOUD uses an Elastic Load Balance to distribute incoming traffic.
-
Communication is carried out securely between the parties with the use of mutual authentication (Mutual TLS, mTLS) implemented in the API Gateway.
Configuring the Service in the Console
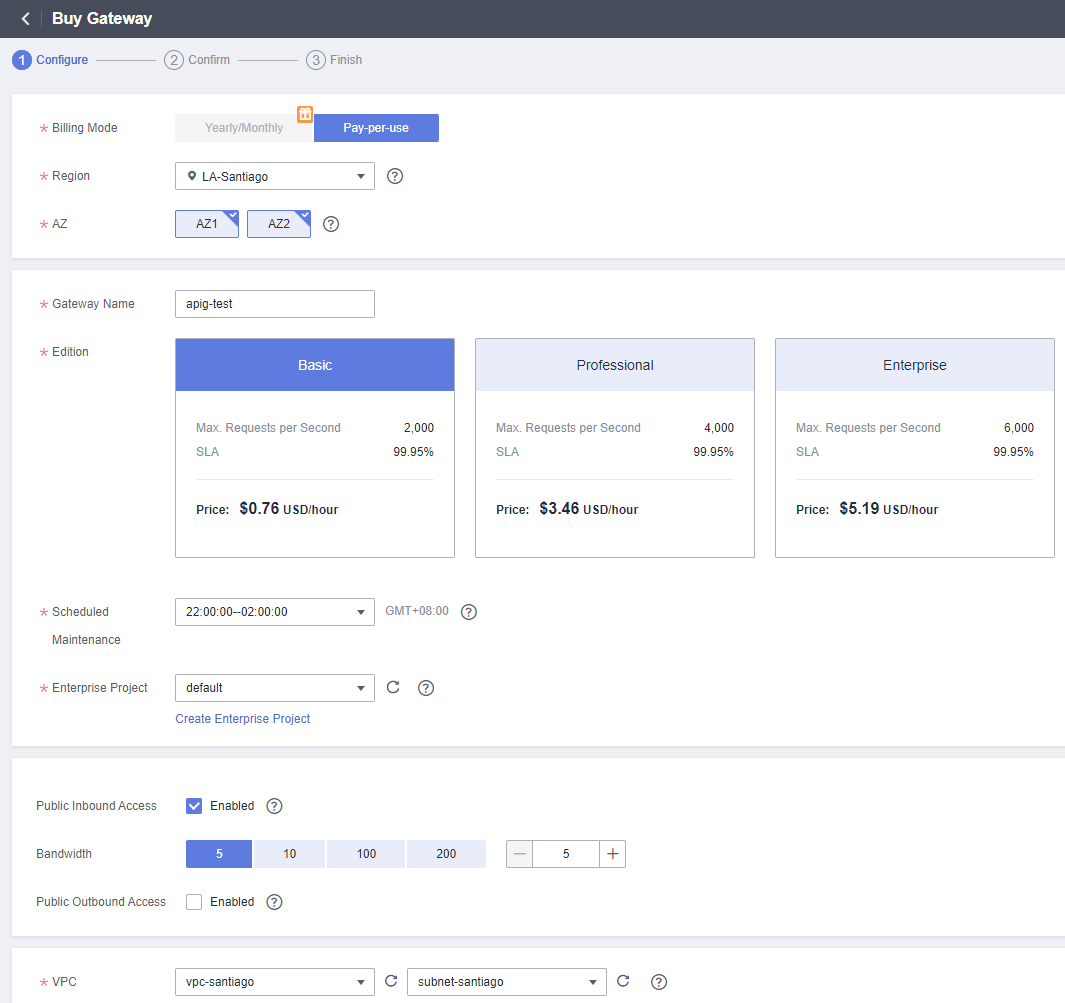
Buying a Gateway
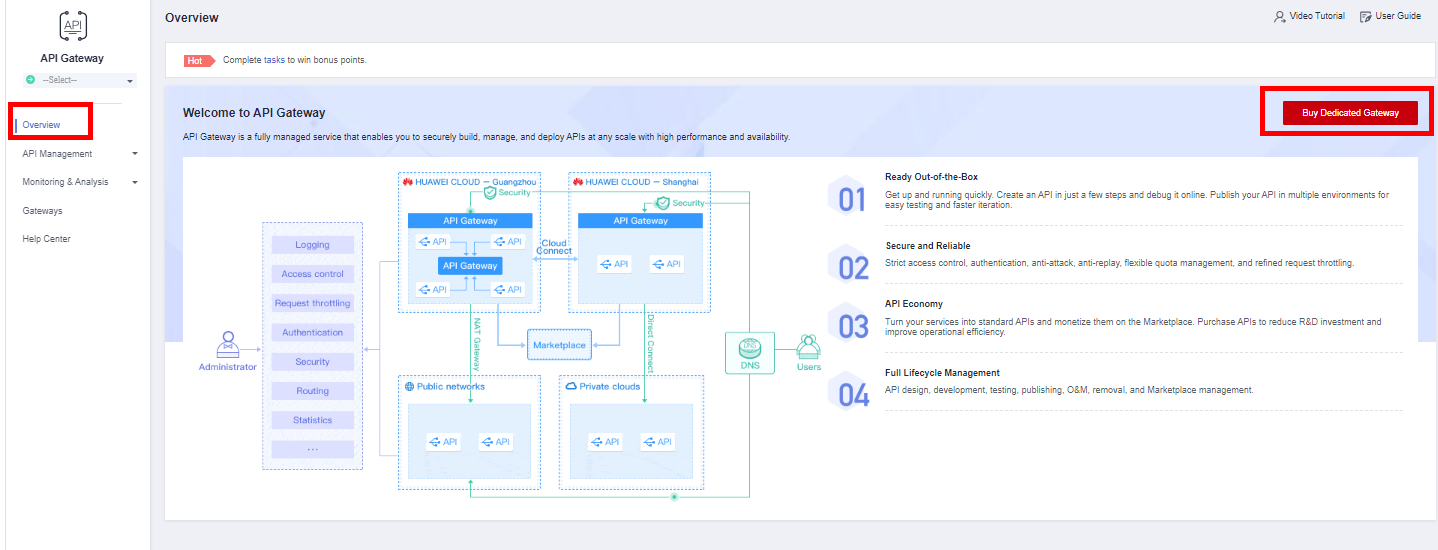
Access the API Gateway service from the Console.
In the Overview option, click Buy Dedicated Gateway.
*For this example, we will use the service in the Santiago region.
Select the specifications according to the Backend API. The Basic edition, which will be used in this example, supports up to 2,000 requests per second.
Pay attention when selecting the Gateway edition, as once you have purchased a specific type of edition, it is not possible to downgrade or upgrade it (it is necessary to create a new API Gateway, export the data from the old gateway, and import into the new one.).
Enable “Public Inbound Access”, select the same VPC, subnet, and Security Group configured for the application server.
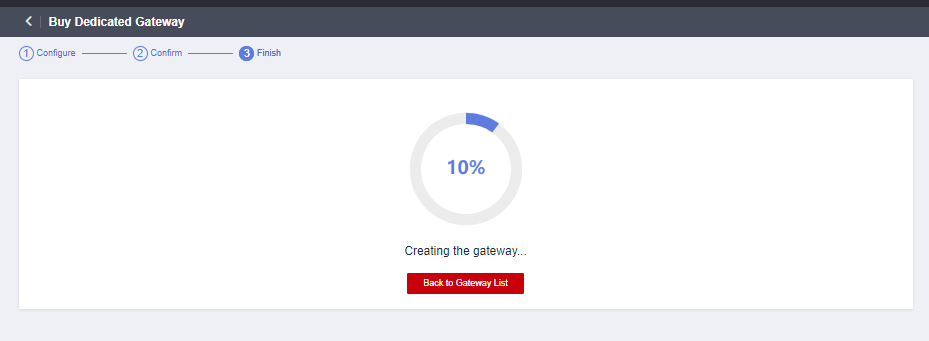
After confirming the parameters defined for the Dedicated Gateway, wait a few minutes until the creation is finished.
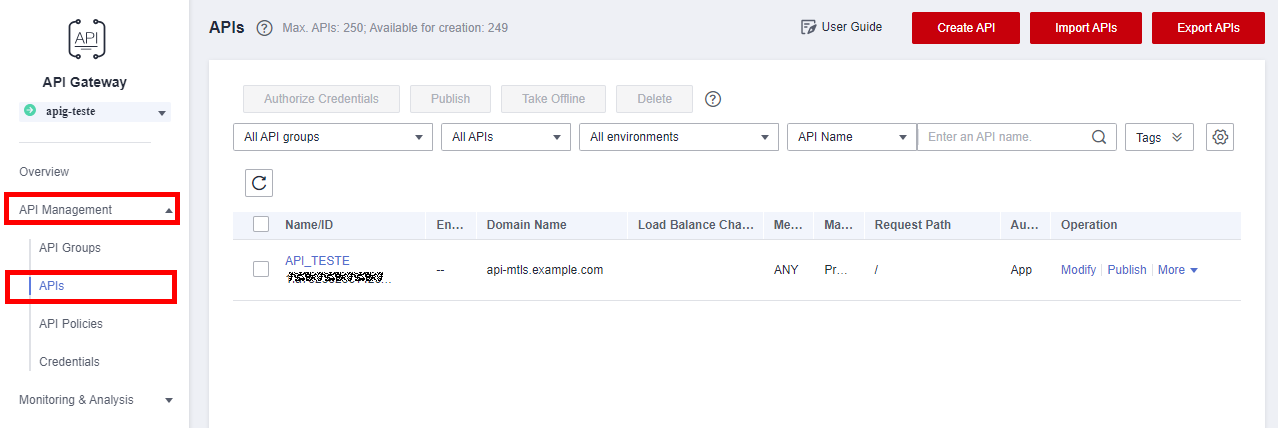
Creating an API
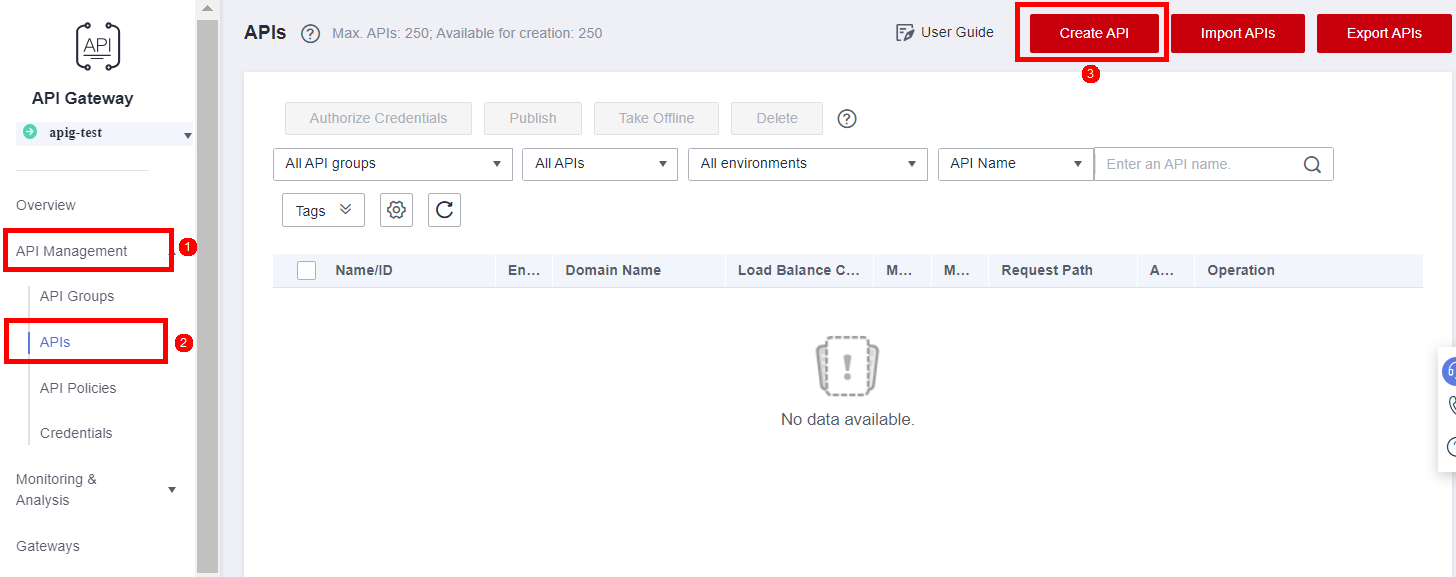
Under API Management (1), click APIs (2) and then create an API by clicking Create API (3).
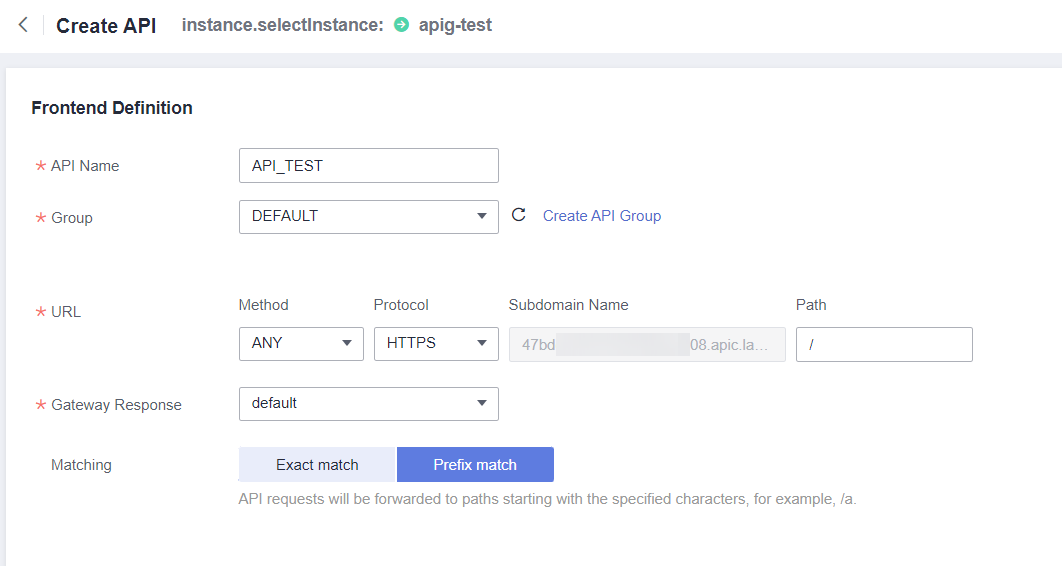
Setting the API Frontend
Under API Name define a name for the new API.
A new group can be created to organize more APIs. In this example, the DEFAULT group will be used.
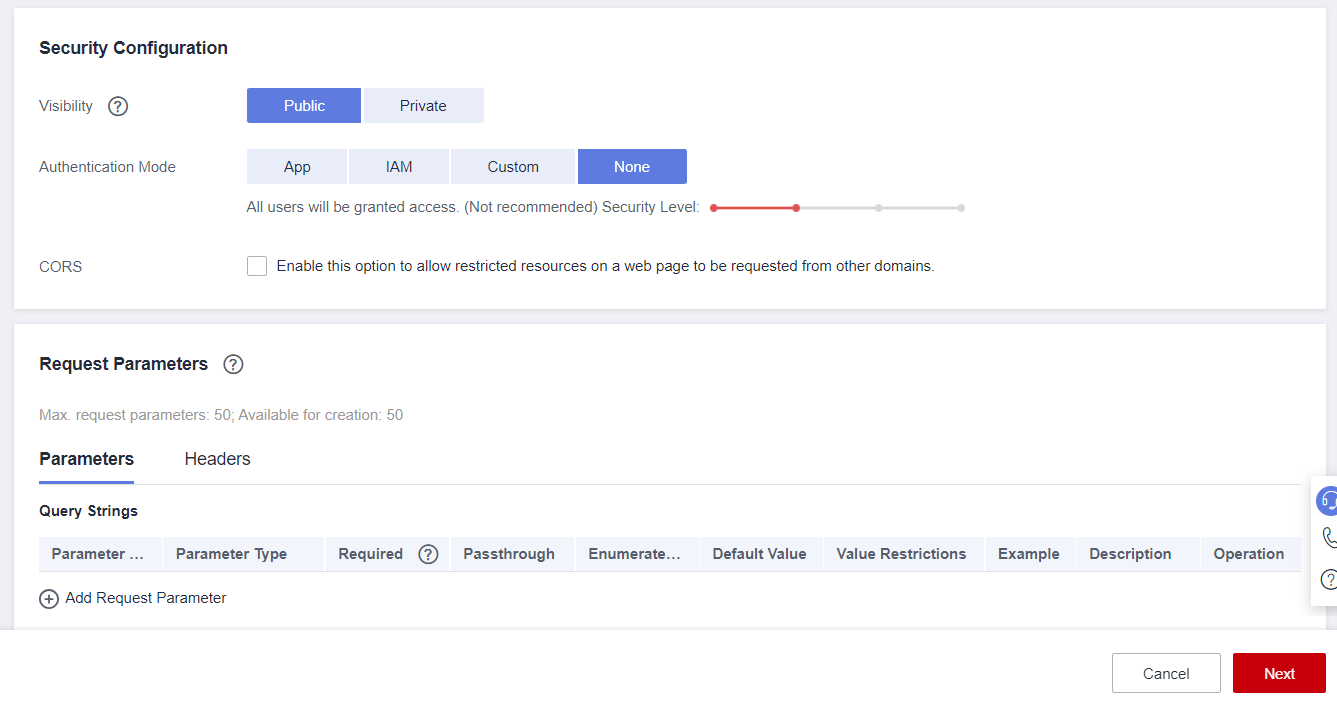
The method used for this API will be ANY since the backend API will be responsible for routing (handling HTTP methods and endpoints/routes). Enter “/” in Path and “Prefix match” in Matching.
Setting the API Backend
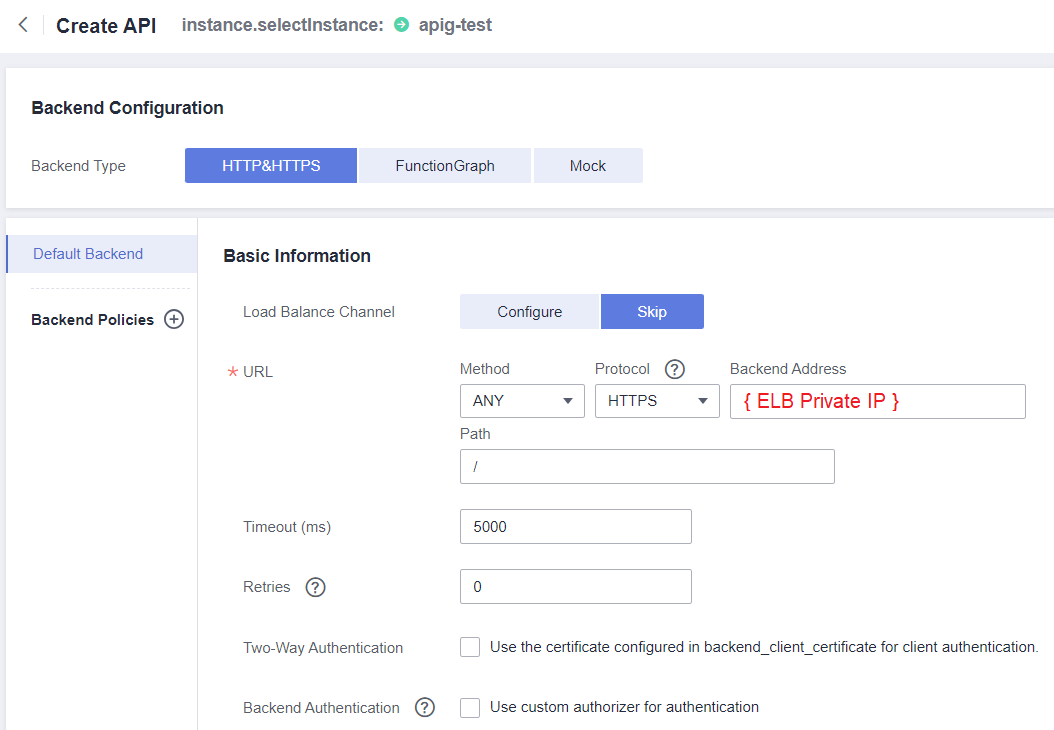
In this example, we will choose the option:
-
Skip for the Load Balance Channel.
-
In URL, we will use the ANY method.
-
The Backend Address will be the private IP address of the Elastic Load Balance associated with the API server.
In Parameter Orchestration, in the Constant Parameters section it is necessary to define a virtual domain name (nonexistent) that will access the backend. This parameter will be received by the HTTP server, and used to define which application will respond to the request.
-
Constant Parameter Name: Host
-
Parameter Location: HEADER
-
Parameter Value: api-mtls.virtual.example (virtual/nonexistent domain)

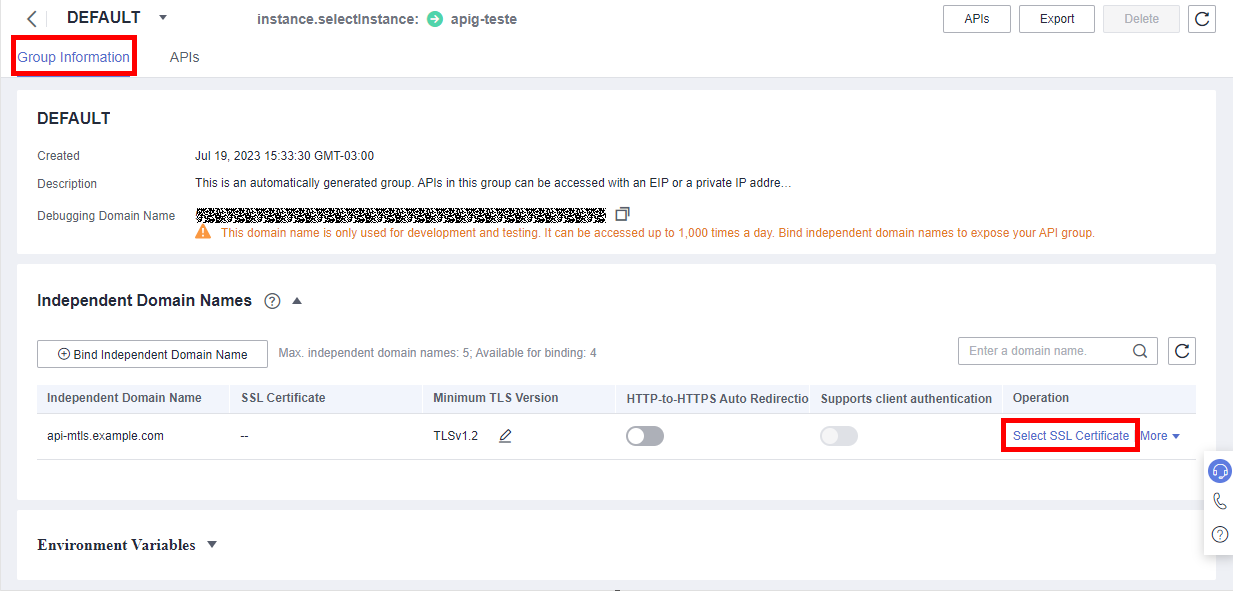
Adding a Domain Name
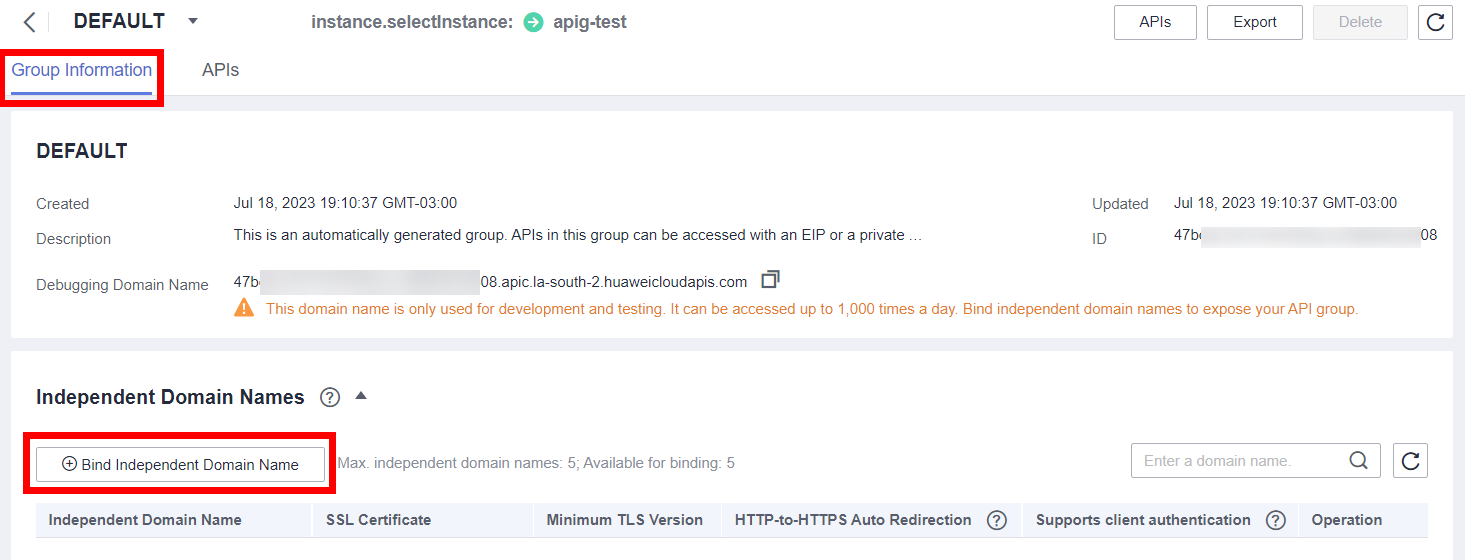
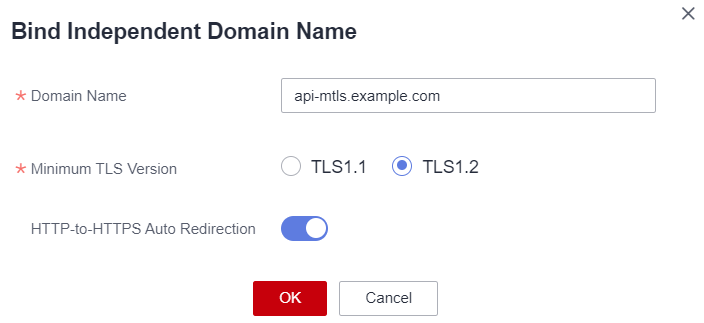
Once the API is created, click “Group Information” and add the domain name that will be accessed by the Client in “Bind Independent Domain Name”.
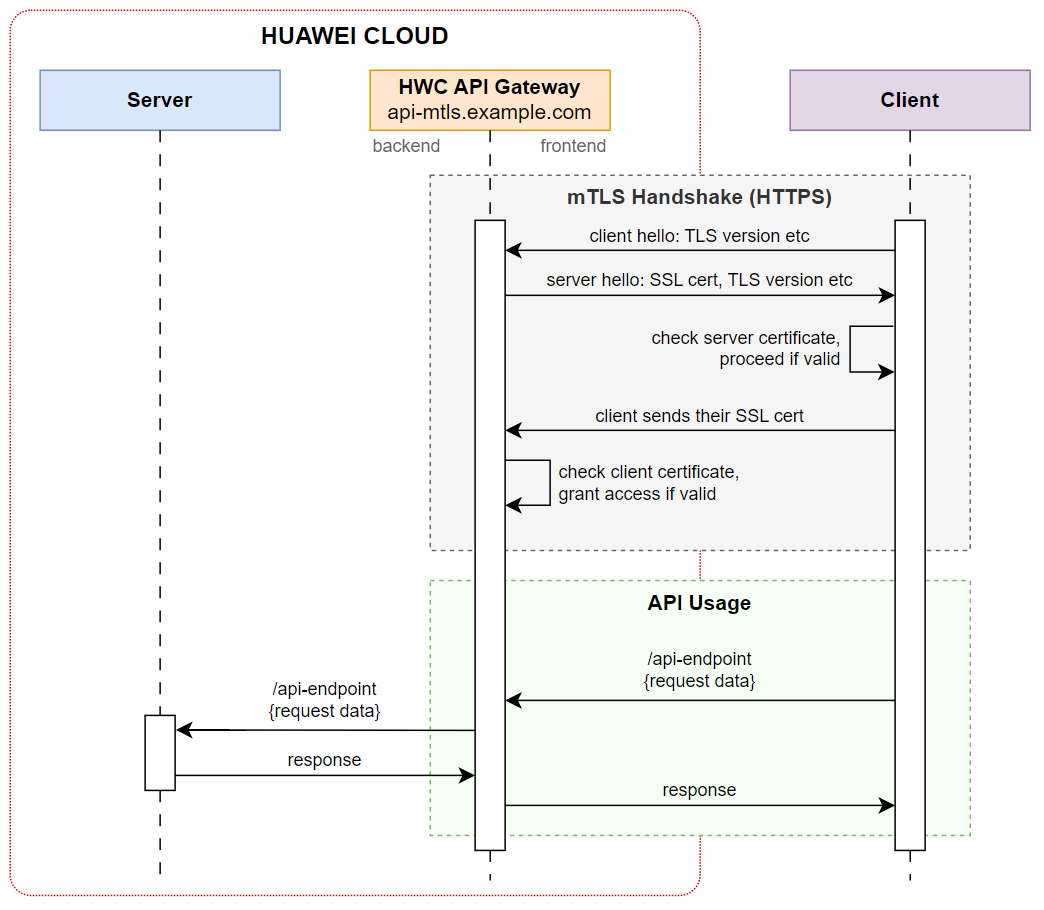
Mutual Authentication (mTLS)
Mutual authentication in a client-server connection will occur using certificates generated with OpenSSL. In this example, the organization responsible for the backend API will be the certificate authority (CA).
mTLS Process
-
The client connects to the server;
-
The server presents its TLS/SSL certificate;
-
The client checks the TLS/SSL certificate from the server, and proceeds only if the certificate from the server is valid/recognized;
-
The client presents its TLS/SSL certificate;
-
The server verifies the client certificate, and authorizes access only if the client certificate is valid/recognized;
-
The client and server exchange information over a secure, encrypted TLS/SSL connection.
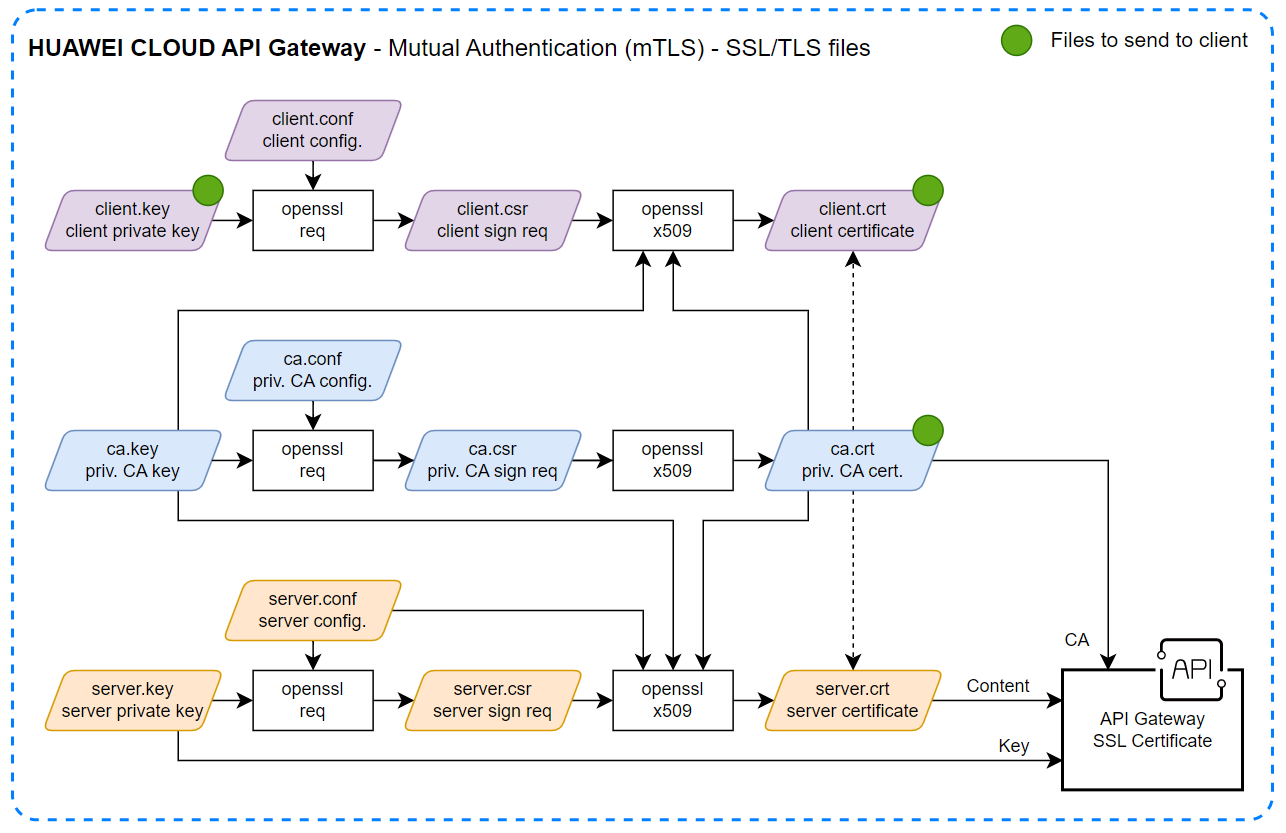
Creating, signing, and validating certificates
This is the list of files that will be generated using the OpenSSL tool:
-
Certificate Authority (CA): ca.conf, ca.key, ca.csr and ca.crt
-
Server: server.conf, server.key, server.csr, and server.crt
-
Client: client.conf, client.key, client.csr, and client.crt
Creating the CA Certificate
Initially, you need to create a configuration file “ca.conf” with the name of the certificate authority organization:
[ req ]
distinguished_name     = req_distinguished_name
prompt                 = no

[ req_distinguished_name ]
O                      = Server Company Name CA
CA files are created using the following OpenSSL commands:
- Generating the private key (KEY):
openssl genrsa -out ca.key 2048
- Signature Request (CSR):
openssl req -new -config ca.conf -key ca.key -out ca.csr
- Generating the certificate (CRT), valid for 365 days
openssl x509 -req -in ca.csr -signkey ca.key \
  -sha256 -days 365 -CAcreateserial -out ca.crt
Creating the Server Certificate
Now the “server.conf” file must be created, updating the company name and domain associated with the API Gateway:
[ req ]
distinguished_name  = req_distinguished_name
prompt              = no
req_extensions      = v3_req

[ req_distinguished_name ]
O                   = Server Company Name
CN                  = api-mtls.example.com

[ v3_req ]
subjectAltName      = @alt_names

[alt_names]
DNS.1               = api-mtls.example.com
Creating the server files using OpenSSL:
- Generating the private key (KEY):
openssl genrsa -out server.key 2048
- Signature Request (CSR):
openssl req -new -config server.conf \
  -key server.key -out server.csr
- Generating the certificate (CRT), valid for 365 days
openssl x509 -req -in server.csr \
  -CA ca.crt -CAkey ca.key -CAcreateserial \
  -sha256 -days 365 -extensions v3_req -extfile server.conf \
  -out server.crt
Creating the Client Certificate
Now the file “client.conf” must be created, with the name of the client’s organization.
[ req ]
distinguished_name     = req_distinguished_name
prompt                 = no

[ req_distinguished_name ]
O                      = Client Company Name
Creating the client files using OpenSSL:
- Generating the private key (KEY):
openssl genrsa -out client.key 2048
- Signature Request (CSR):
openssl req -new -config client.conf \
  -key client.key -out client.csr
- Generating the certificate (CRT), valid for 365 days
openssl x509 -req -in client.csr \
  -CA ca.crt -CAkey ca.key -CAcreateserial \
  -sha256 -days 365 -extensions v3_req -extfile client.conf \
  -out client.crt
Some applications, however, use a single password-protected PFX file to perform mTLS authentication. In this case, OpenSSL is also used to combine the “client.crt”, “client.key”, and “ca.crt” files into a single PFX file:
openssl pkcs12 -export -inkey client.key -in client.crt \
  -certfile ca.crt -out client.pfx
Verification of certificates
- Server certificate verification:
openssl verify -CAfile ca.crt server.crt
- Client certificate verification:
openssl verify -CAfile ca.crt client.crt
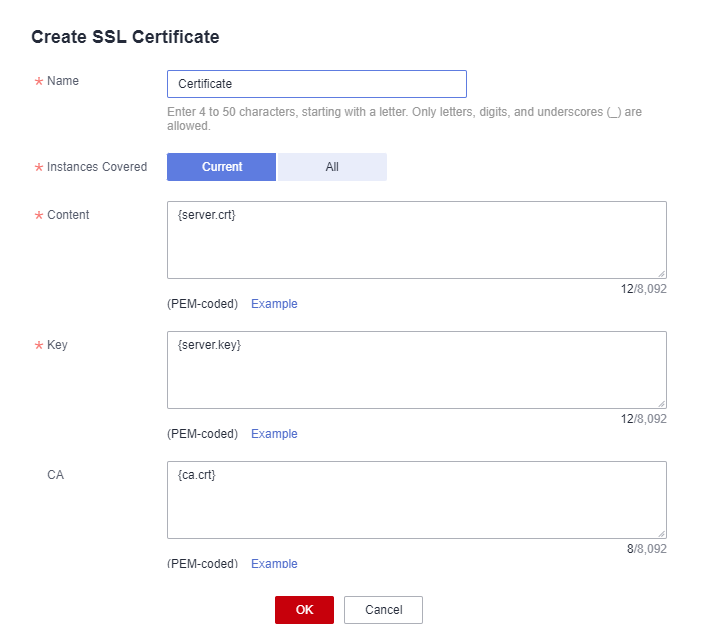
Configuring certificates in the Console
Access the API created on the API Gateway.
In Group Information add the certificates in Select SSL Certificate:
-
Content: contents of the “server.crt” file (server certificate)
-
Key: contents of the “server.key” file (server’s private key)
-
CA: contents of the “ca.crt” file (CA certificate)
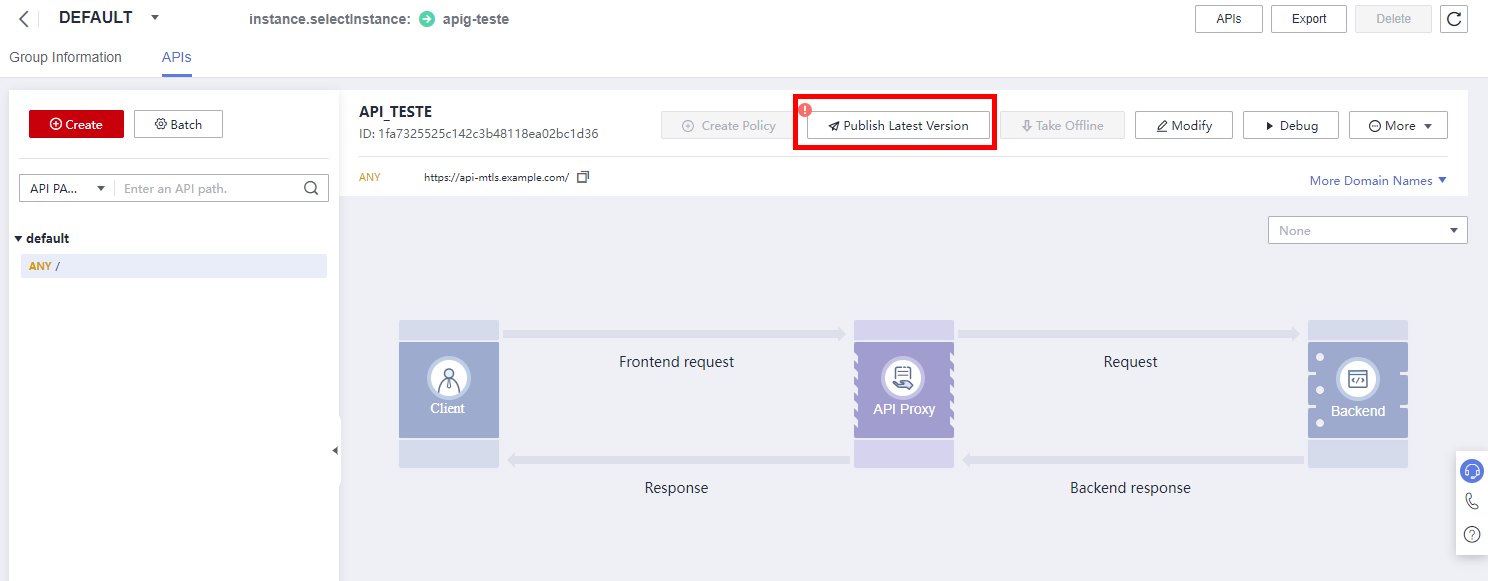
Return to the APIs tab and publish the API by clicking Publish Latest Version.
Testing mTLS
Test Server
As the API server, a simple Python script is used, based on the Flask library, which returns some parameters of the HTTP request (Host, method and path) in JSON format.
from flask import Flask, request
from pprint import pprint

app = Flask(__name__)

HTTP_METHODS = [
    'GET', 'HEAD', 'POST', 'PUT', 'DELETE',
    'CONNECT', 'OPTIONS', 'TRACE', 'PATCH']

@app.route("/", methods=HTTP_METHODS)
@app.route("/<path:path>", methods=HTTP_METHODS)
def hello_world(path=''):
    ret = {
        'host': request.headers['host'],
        'method': request.method,
        'path': request.full_path
    }
    pprint(ret)
    return ret
Using curl
The curl tool is used to perform data transfer using several protocols, HTTP being one of them.
Since the certificate authority is private (generated by OpenSSL, specifically for the API Gateway), the certificate will not be recognized as valid by any web client.

You must provide the CA certificate (–cacert ca.crt) and disable CRL checking (–ssl-no-revoke) to make a request to the API Gateway.

The error “APIG.0205” indicates that client authentication was not successful because the client’s certificate and private key were not specified. To send this information, the –cert client.crt and –key client.key options are used.
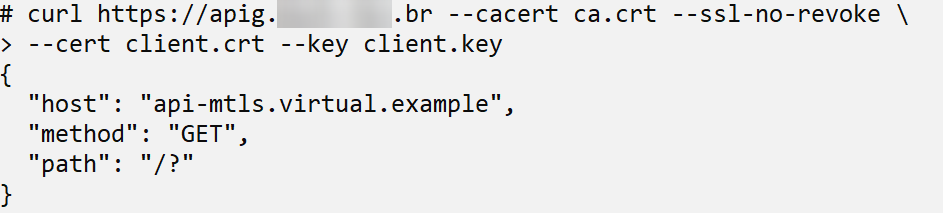
Once authentication was successful, the request was forwarded to the backend server, and the response obtained was returned by the Flask application.
If an invalid certificate or private key is supplied, API Gateway returns the error code “APIG.0205”.

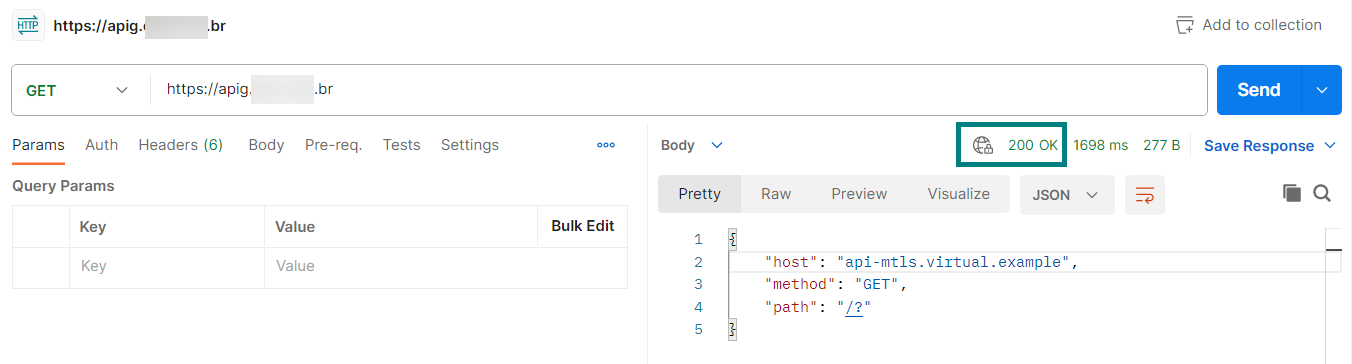
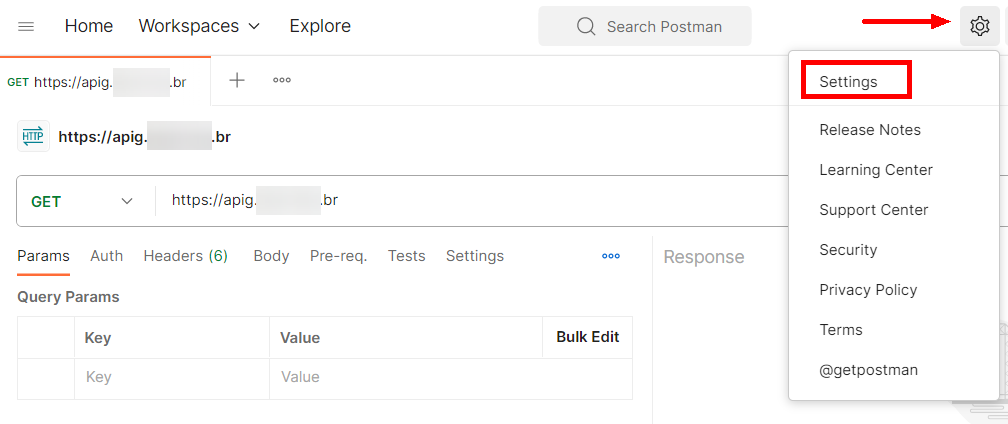
Using Postman
Postman (https://www.postman.com/) is a platform that enables the design, construction, and testing of APIs.
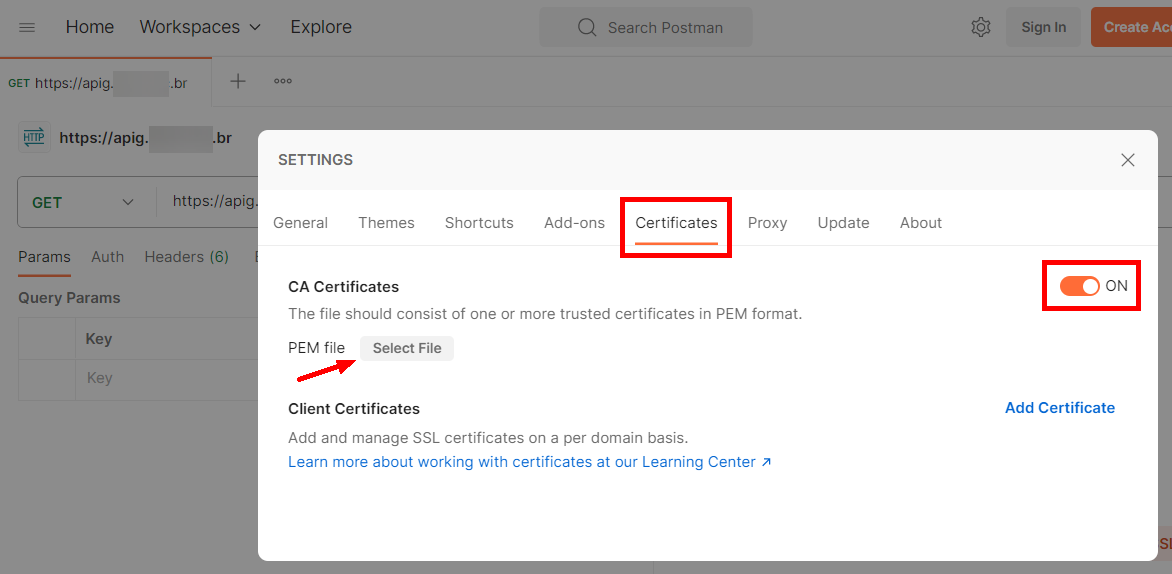
Like curl, it is not possible to make any requests to API Gateway without first configuring the CA certificate.
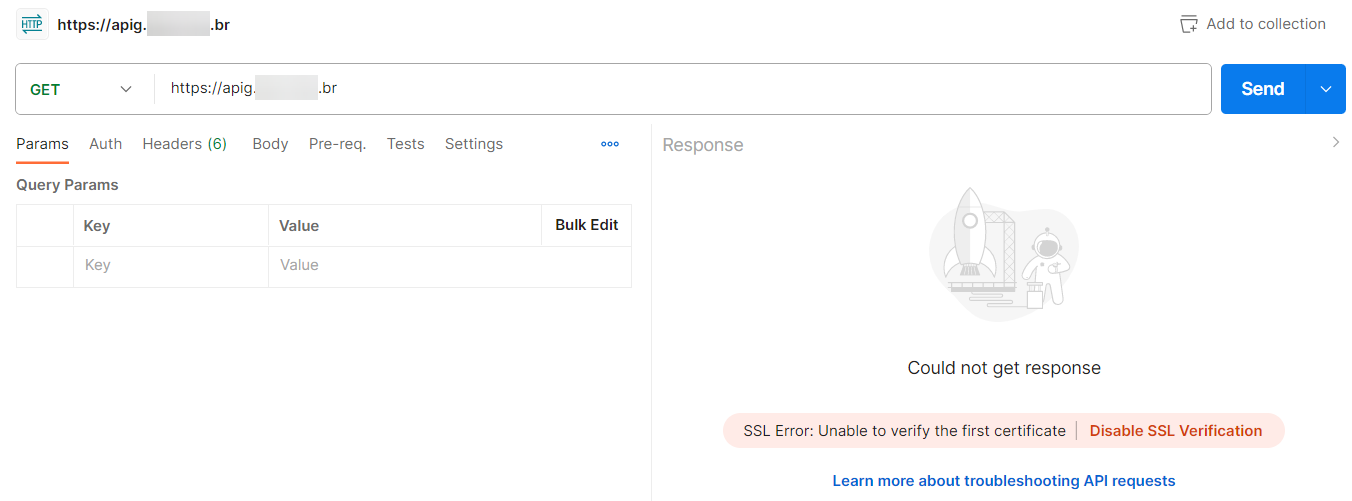
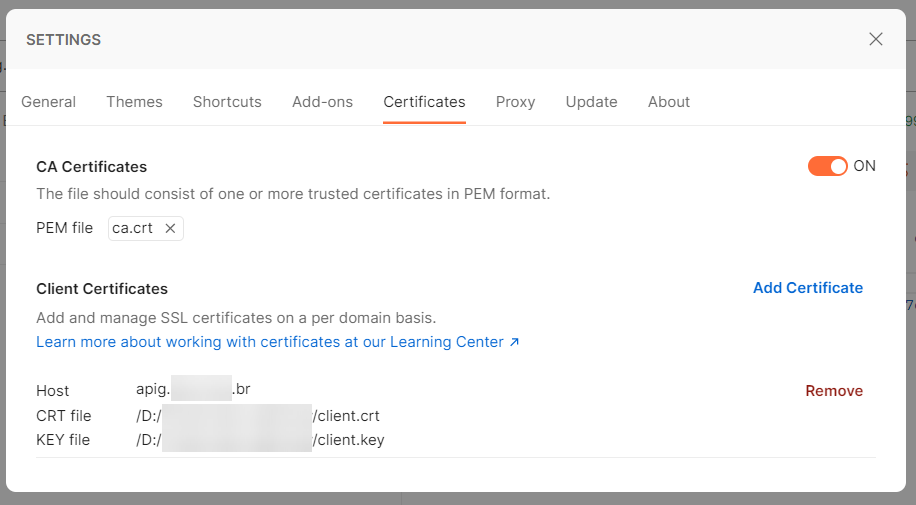
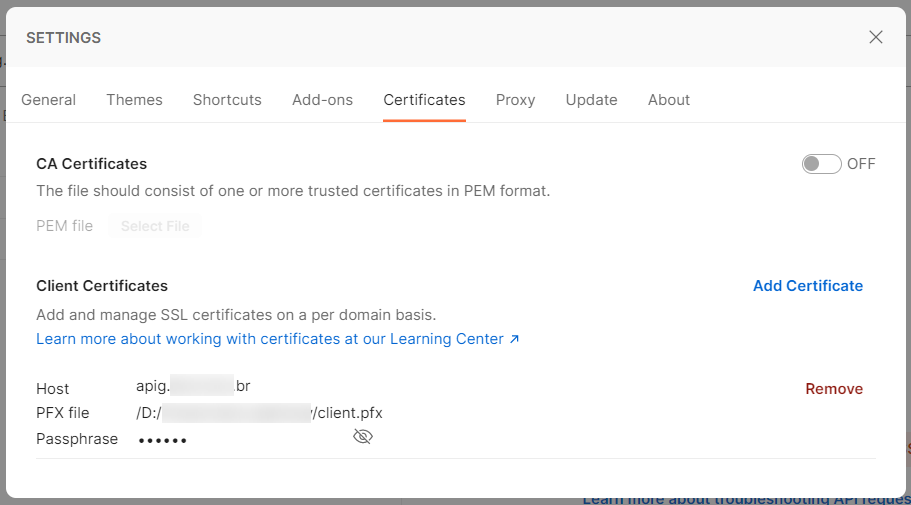
The CA certificate can be configuring in Settings > Certificates by enabling the “CA Certificates” option and clicking “Select File”.
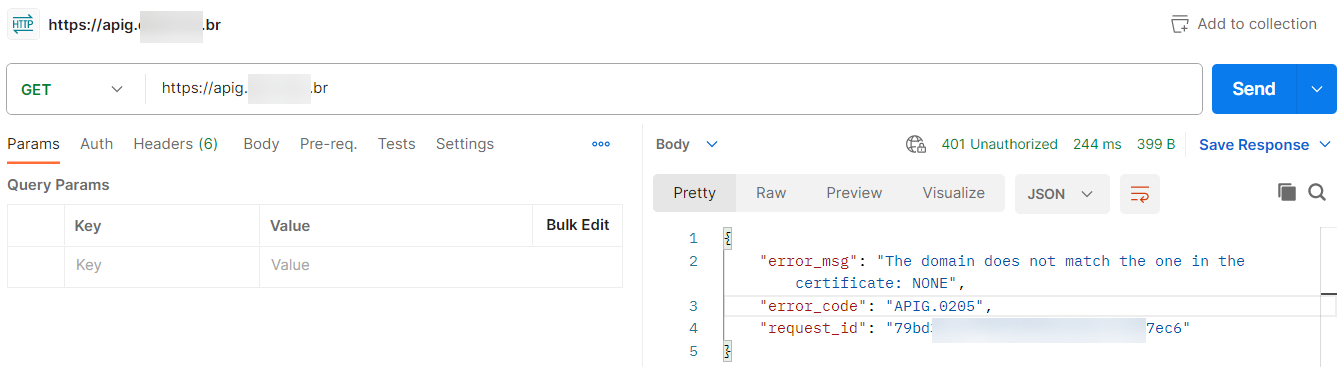
Without providing the client’s certificate and private key, API Gateway returns the error “APIG.0205”.
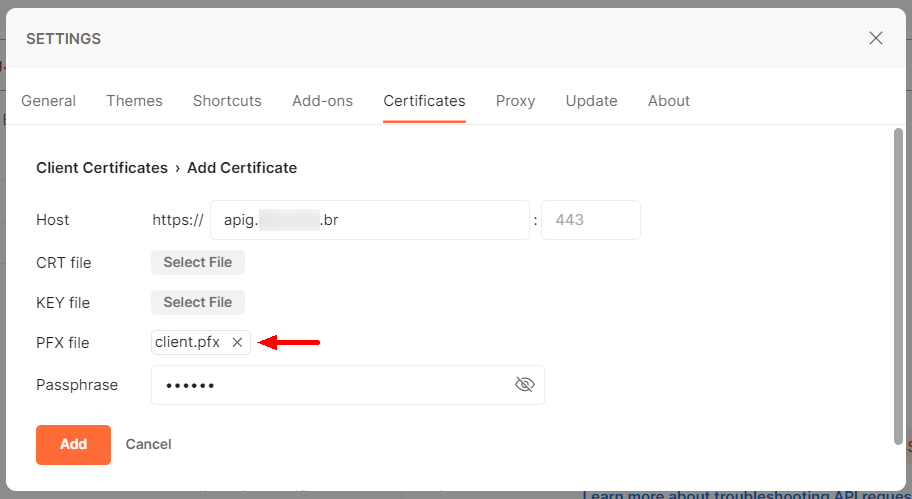
This information is added in Settings > Certificates > Client Certificates, clicking on “Add Certificate”, informing the domain name, the CRT and KEY files.
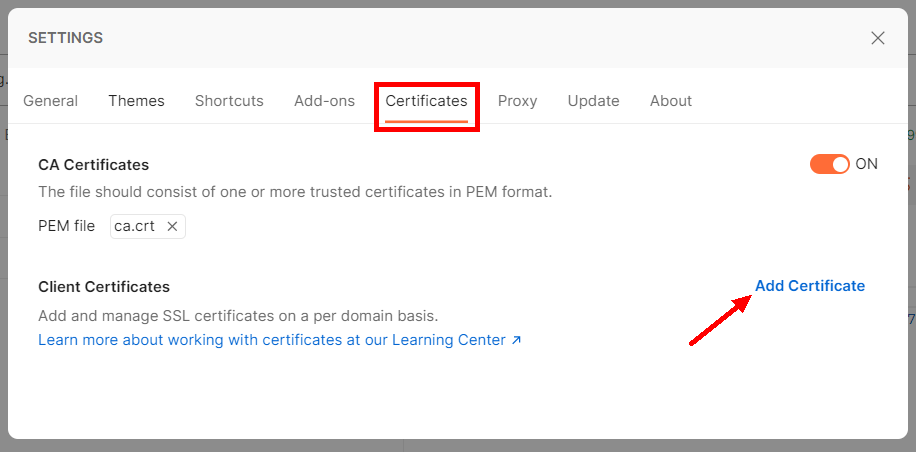

If the PFX file is used, leave the fields “CRT file” and “Key file” blank, inform the PFX file and its password. When using the PFX file, it is also not necessary to configure the CA certificate, since it is already included in the same file.
Once the client files are configured, the request is forwarded to the backend server.