![]()
SFTP to OBS using CDM
V1.0 – July 2023
| Version | Author | Description |
|---|---|---|
| V1.0 – 2023-07-20 | Rodolfo Carvalho 50032519 | Initial Version |
| V1.0 – 2023-07-20 | Gabriel Gutierrez g00817435 | Document Review |
CREATING ECS AND SETTING THE SFTP USER
Creating the ECS
ECS is a computing service offered by Huawei Cloud, therefore, it is necessary to log in the console and request the services that make the ECS work in efficient and secure way.
-
The network services are essential for ECS work properly. First, choose a VPC and a subnet to bound a private identification of the ECS and the basic network services such as broadcast and DNS. Then, an EIP should be allocated for internet connection. Create a custom security group to protect the access to the ECS;
-
In this example, Ubuntu 22.04 server 64bit will be used.
Verifying SSH
The SSH protocol enables safe network connection in the TCP/IP protocol; SFTP is an extension protocol of SSH for file transfer. Therefore, to create a SFTP user in a machine it is necessary to install or update SSH, enable and start it.
- To check if the SSH protocol is installed and the version use the command:
ssh -V. Image 1 shows that SSH is already installed.

-
If the installation is necessary use: sudo apt install ssh -y
-
To enable ssh: sudo systemctl enable ssh
-
To start ssh use: sudo systemctl start ssh
-
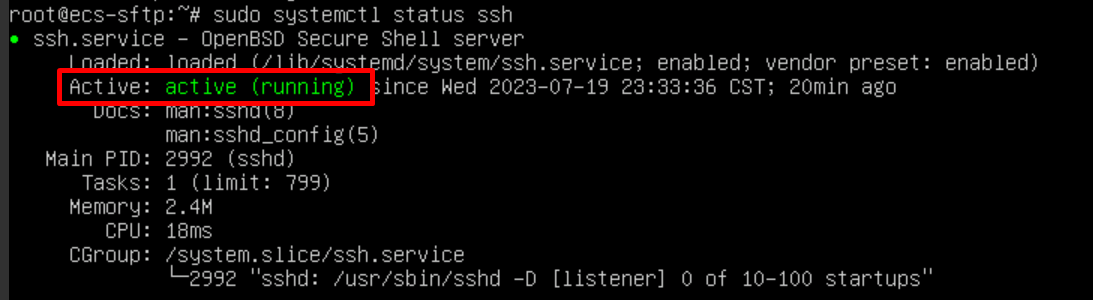
Check the ssh status of ssh using: sudo systemctl status ssh. Notice if the status shows active (running). SSH should be active, as image 2 shows.
Creating SFTP Group and User
Groups are methods to concatenate users with the same permissions and limitations, improving the security and organization.
-
Create a SFTP group and chose a name for it. In this case, the chosen name is “sftp”: sudo addgroup sftp
-
Create the user. In this case, the chosen user name is “rodolfo”: sudo useradd rodolfo
-
It is possible to confirm the user creation and home directory, use: less /etc/passwd | grep rodolfo. The result shows the path of “Rodolfo” in the “passwd” file, therefore, the user was created (as image 3 shows)

-
Set a password to the user: sudo passwd rodolfo
-
Add the user to “sftp” group: sudo usermod -a -G sftp rodolfo
-
To verify if the user was added successfully, use the following command: grep sftp /etc/group (as shown in image 4)

Setting Permissions
It’s important to set permissions and limitations for the user. In this way, when a client connects with it, it will not be able to access the content inside the entire server, only the data inside SFTP root folder associated to the user.
-
Create a user access directory called “Document”: sudo mkdir -p /var/sftp/Document
-
Guarantee that “/var/sftp” directories are under the ownership of the root user and user group: sudo chown root:root /var/sftp
-
Configure the owner, group and others permissions for “sftp” group using: sudo chmod 755 /var/sftp. This command guarantees that the owner has full permission and the group and others have only read and execute permissions.
-
Allow the user “rodolfo” to have access only to “Document” folder: sudo chown rodolfo:rodolfo /var/sftp/Document
-
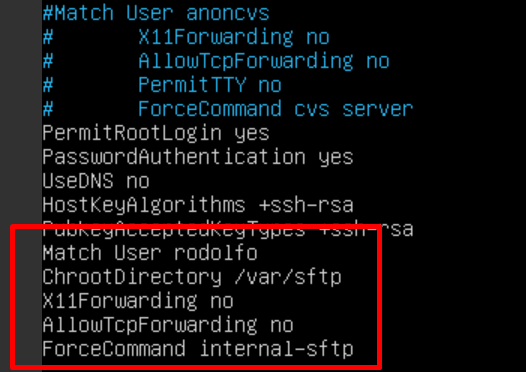
Change SSH configuration to set the user’s permissions. For this, it’s necessary to change “/etc/ssh/sshd_config” file and add these lines:
-
Match User rodolfo: specifies which user these changes are for;
-
ChrootDirectory /var/sftp: the user is restricted to “/var/sftp” directory;
-
X11 Forwarding no: the access to graphical applications and forwarding is disabled;
-
AllowTcpForwarding no: disables tunneling to improve security;
-
ForceCommand internal-sftp: the SSH connection will be established only after login
-
-
Restart the ssh service: sudo systemctl restart ssh
-
The final part is to check the user’s configuration, using the host’s IP to enter in user’s directory: sftp rodolfo@{IP}
-
Finally, check if the “Document” folder can be seen using command: ls
Checking if SFTP Connection can be established
The final part is to check if SFTP connection can be established and files can be transferred. To do this, FileZilla client will be used.
-
Download and install FileZilla’s client on a remote machine: https://filezilla-project.org/
-
Add an Inbound Security Group rule related to the SFTP port (number 22), using the public IP address of the remote machine. The public IP can be obtained using this website: https://ip4.me/
-
Open FileZilla and go to “Open Site Manager” (in the left upper corner). Enter ECS’s public IP address, username, port=22, “SFTP” as connection type and user’s password. If the connection is successful, a message like Image 6 will appear;
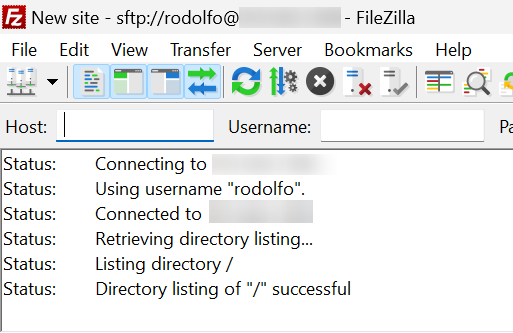
- If the connection is successful, the user’s directory will be accessible in FileZilla and it’s possible to upload and download files and directories.
OBS BUCKET
Create an OBS bucket
Object Storage Service is a Huawei Cloud Service that enables object type storage, therefore, the data will be stored in a bucket created in OBS console. It’s necessary to create one bucket and a directory inside it to store the files after the linking process.
-
Log in Huawei Cloud Console. On the upper left, open the services tab and search for Object Storage Service. On the upper right, click on “Create Bucket”;
-
Choose the Region of the bucket. In this case, the chosen region is Santiago;
-
Choose a name for the bucket, preferably related to the service. In this case, the chosen name was “sftp_obs”;
-
Use “Standard” as Default Storage Class
-
Use “Private” as Bucket Policy
-
Set Service Encryption as “disabled”
USING CDM TO MIGRATE
Creating a CDM Instance
Cloud Data Migration is a Huawei Cloud Service used to migrate homogeneous or heterogeneous types of data in easy and reliable way from a data source to another.
-
Go to Huawei Cloud Console. On the upper left, open the services tab and search for CDM or Cloud Data Migration. On the upper right, click on “Buy CDM Cluster”;
-
Choose a name accordingly to the desired process. In this case, the Cluster created is “cdm_sftp”;
-
Choose the flavor based on the computational needs;
-
Network is the most important part. There are four situations:
-
The CDM cluster and the Huawei Cloud service are in the same region, VPC, subnet and security group, therefore, they are able to connect freely, without routing and security specifications;
-
If they are in the same Region and VPC, but in different subnet or security group, the routing and security group rules must be established;
-
If they are in the same Region, but in different VPCs, a peering connection is needed;
-
If they are in different Regions, then Internet connection or Direct Connect must be stablished;
-
-
Just confirm the information in the next step and submit;
-
The created CDM cluster will appear in Cluster Management page as Image 7 shows;

Linking both ends with CDM
Linking is the process of establishing a CDM connection and identifying the settings of the services whose data will be migrated.
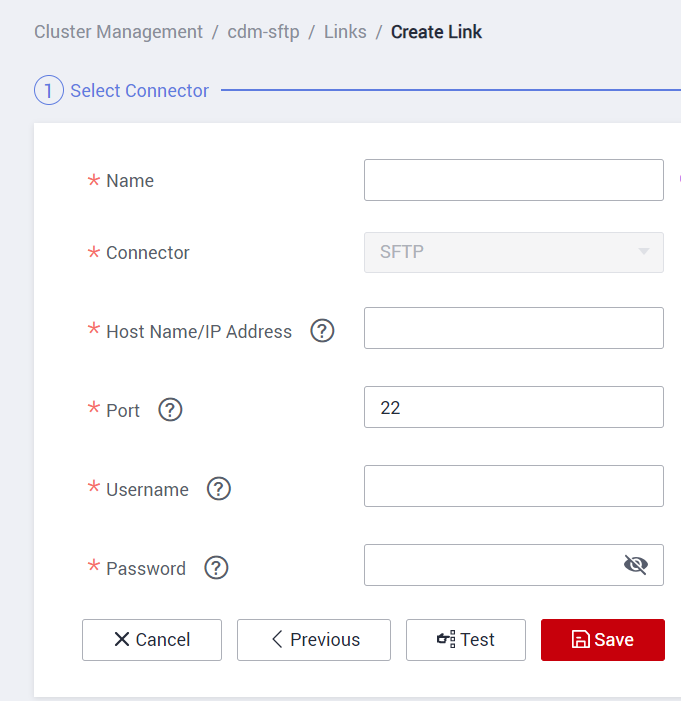
Creating SFTP Link
- In cluster management, find the desired CDM and click in Job Management (Image 8);

- Click in “Links” and choose “Create Link” (Image 9);

-
Choose the data type service. In this case, find “SFTP” type and click “Next”;
-
Choose a name accordingly to the desired service. In this case: “sftp_link”;
-
Put the IP address of the host;
-
The port number is defined by the service type. In this case, the service is SFTP, therefore, the SFTP port is 22;
-
Configure the user name and password;
-
Test the connection and then click “Save”;
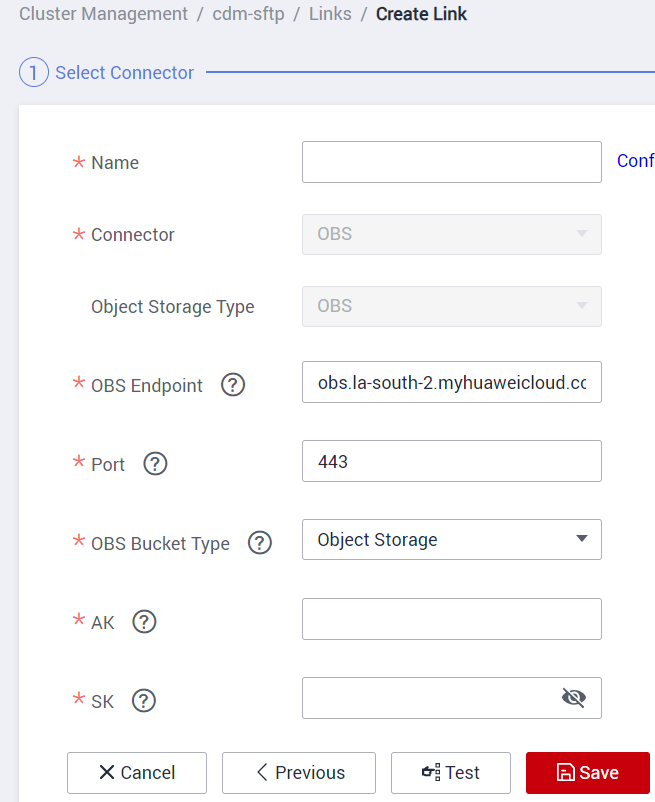
Creating OBS link
-
Follow the first two steps of SFTP link and choose the Object Storage Service;
-
Choose the name accordingly. In this case: “obs_link_sftp”;
-
Select the Object endpoint:
-
Go to OBS console page and find the desired bucket;
-
Click on the bar, not on the OBS name. This action will show the Basic Information tab, it is possible to find the endpoint in this tab;
-
-
Select the port accordingly with the desired connection;
-
Obtain AK/SK keys with OBS Bucket access and configure in this step;
-
Test the connection and then click “Save”;
When created, the services will appear in the Links tab as shown in Image 12

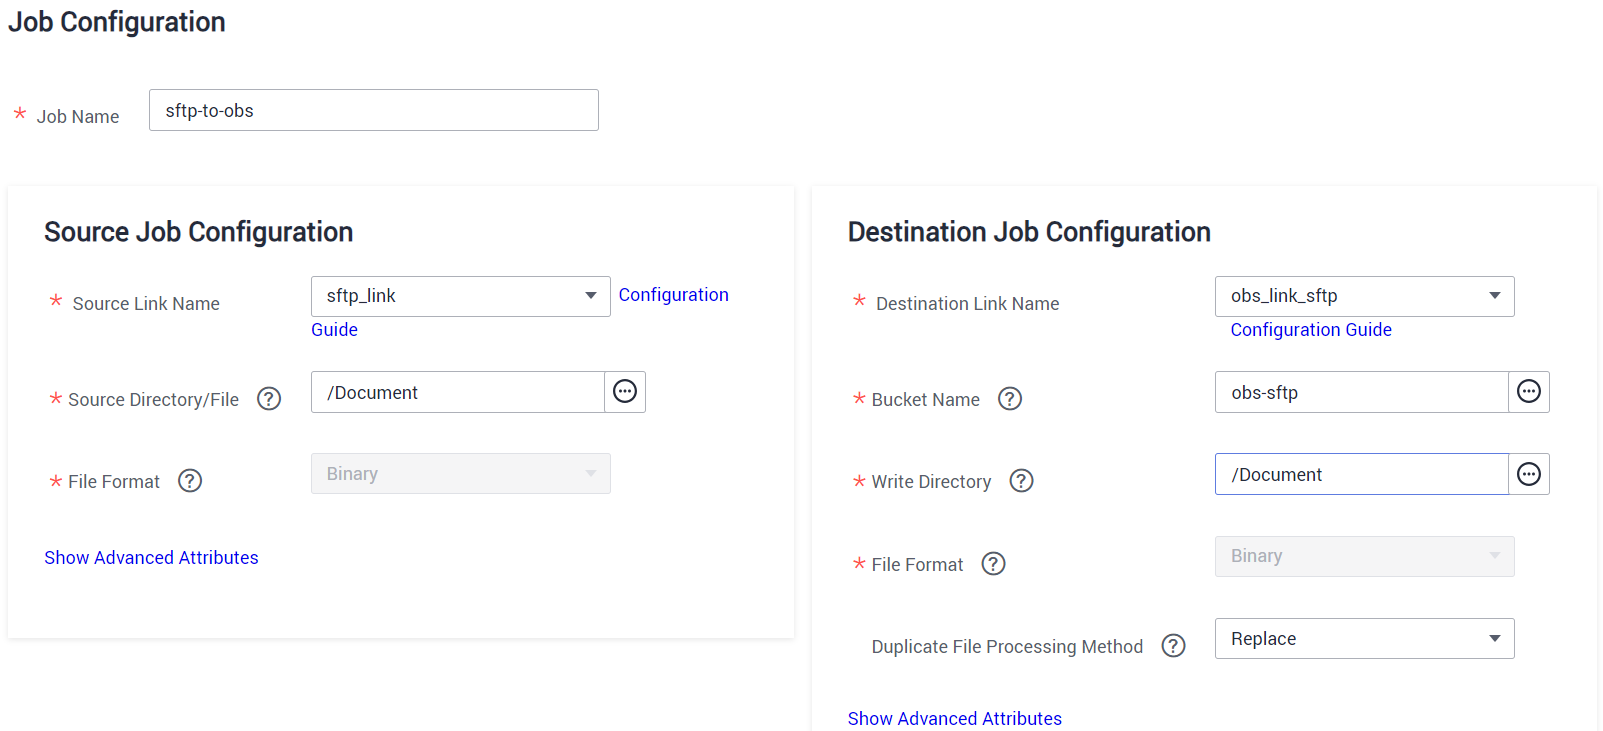
Creating a Job
The job connects the CDM links and describes how the migration will behave from the source to CDM and from CDM to the destination.
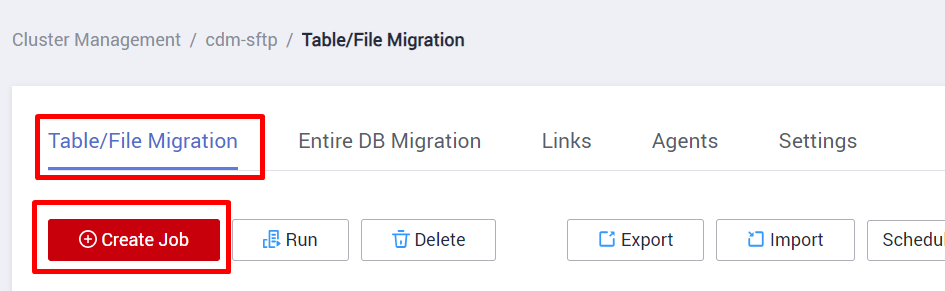
- In Job Management, select Table/File Migration, since only some directories inside SFTP will be migrated (Image 13);
-
Select the source and the destination CDM links. In this case, the source is “sftp_link” and the destination is “obs_link_sftp”;
-
Select the directory or file inside the sftp_link to forward data. In this case, the “Document” folder inside rodolfo;
-
Choose the desired bucket and a desired destination directory. In this case, put Document or sftp;
-
If there’s no specific advanced setting, choose Next;
-
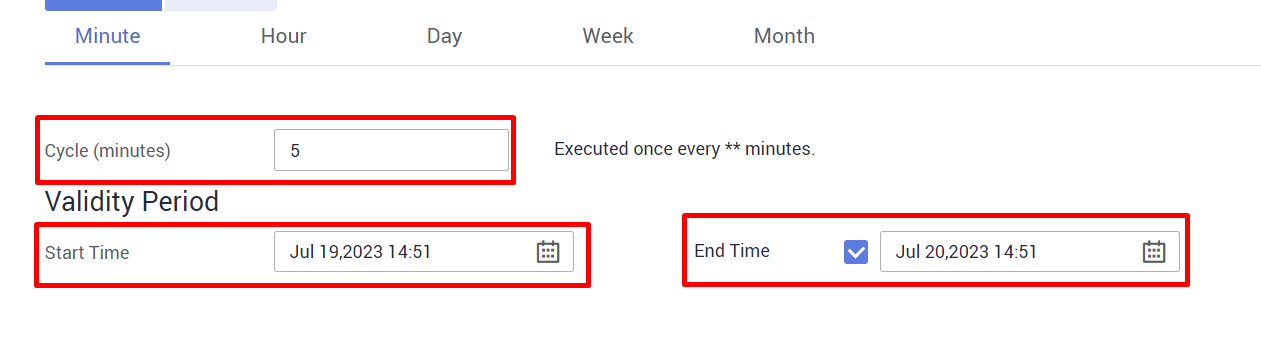
Configure the schedule Execution to verify changes in the source and update in the destination bucket. In this case, the chosen time cycle is 5 minutes, to be executed for 24 hours (Image 15);
- If the service is created correctly, it will appear in the Table/File Migration tab. Choose Run and see if the Migration Status changes to Succeeded (Image 12);

References
Installing SSH and Configuring SFTP User in Ubuntu Server 22.04:
https://itslinuxfoss.com/install-set-up-sftp-server-ubuntu-22-04/
Cloud Data Migration> Service Overview> What Is CDM?
https://support.huaweicloud.com/intl/en-us/productdesc-cdm/cdm_01_0143.html
Cloud Data Migration> User Guide> Managing Links> Creating Links
https://support.huaweicloud.com/intl/en-us/usermanual-cdm/cdm_01_0023.html
Cloud Data Migration> User Guide> Managing Jobs> Source Job Parameters> From FTP/SFTP
https://support.huaweicloud.com/intl/en-us/usermanual-cdm/cdm_01_0039.html
Cloud Data Migration> User Guide> Managing Jobs> Destination Job Parameters> To OBS
https://support.huaweicloud.com/intl/en-us/usermanual-cdm/cdm_01_0044.html
Cloud Data Migration> User Guide> Managing Jobs
https://support.huaweicloud.com/intl/en-us/usermanual-cdm/cdm_01_0032.html